

This project is building on and heavily based on this project from Pete Warden and Gustav Neustadt
I’ve organised this project into 3 categories; all the items I list in the categories are simply based on the way I made the wand, and after reading this guide, you should have enough information to remix this project into something more suitable for your needs. Each of these categories will have several subcategories and will go through both the items required and the steps involved in building and coding the project.
Those categories are:
Wand internals
Wand externals
Spell handling Raspberry Pi
Wand internals
Hardware
To get started, you will need a few parts to run the functionality of the wand, the most essential of which is the Arduino. For this project, I used an Arduino Nano 33 BLE. This board is small, needs very little power and is powerful enough that I have never had issues with any delay from the wand.
For powering the Arduino, I used a PowerBoost 500 Charger - Rechargeable 5V Lipo USB Boost @ 500mA+, which is a power supply that will convert the battery power we have to the correct voltage for our Arduino. The battery I used is an EVE ICR18650 35V 3.6V 3500mAh - 10.2A Li-Ion battery, but any 3.7ish volt battery should work with the Power 500. Please proceed with caution since I fried 3 Power 500 boards in the making of this project, and therefore shouldn’t be trusted to advise you on them.
Finally, I would highly recommend a 9-Axis Sensor Wireling (Referral link), it is the same sensor as the Arduino uses on a tiny board, which allowed me to greatly slim the tip of the final wand. If you choose to get this, I would also recommend buying at least one 5-Pin Wireling Cable (Referral link). This makes it far easier to wire the 9-Axis to the Arduino board.
I also recommend getting a 2-Pin connector (Referral link) as this will make wiring the battery to the PowerBoost much easier.

Two wires (red and black) are going to the right. Red is power in for the Arduino, coming from the power supply, and black is ground.
Four wires are going left (Red, yellow, green, and black) connecting to the 9-axis. They connect as shown on the left, in the order black, red, yellow and green. The last wire is unconnected.
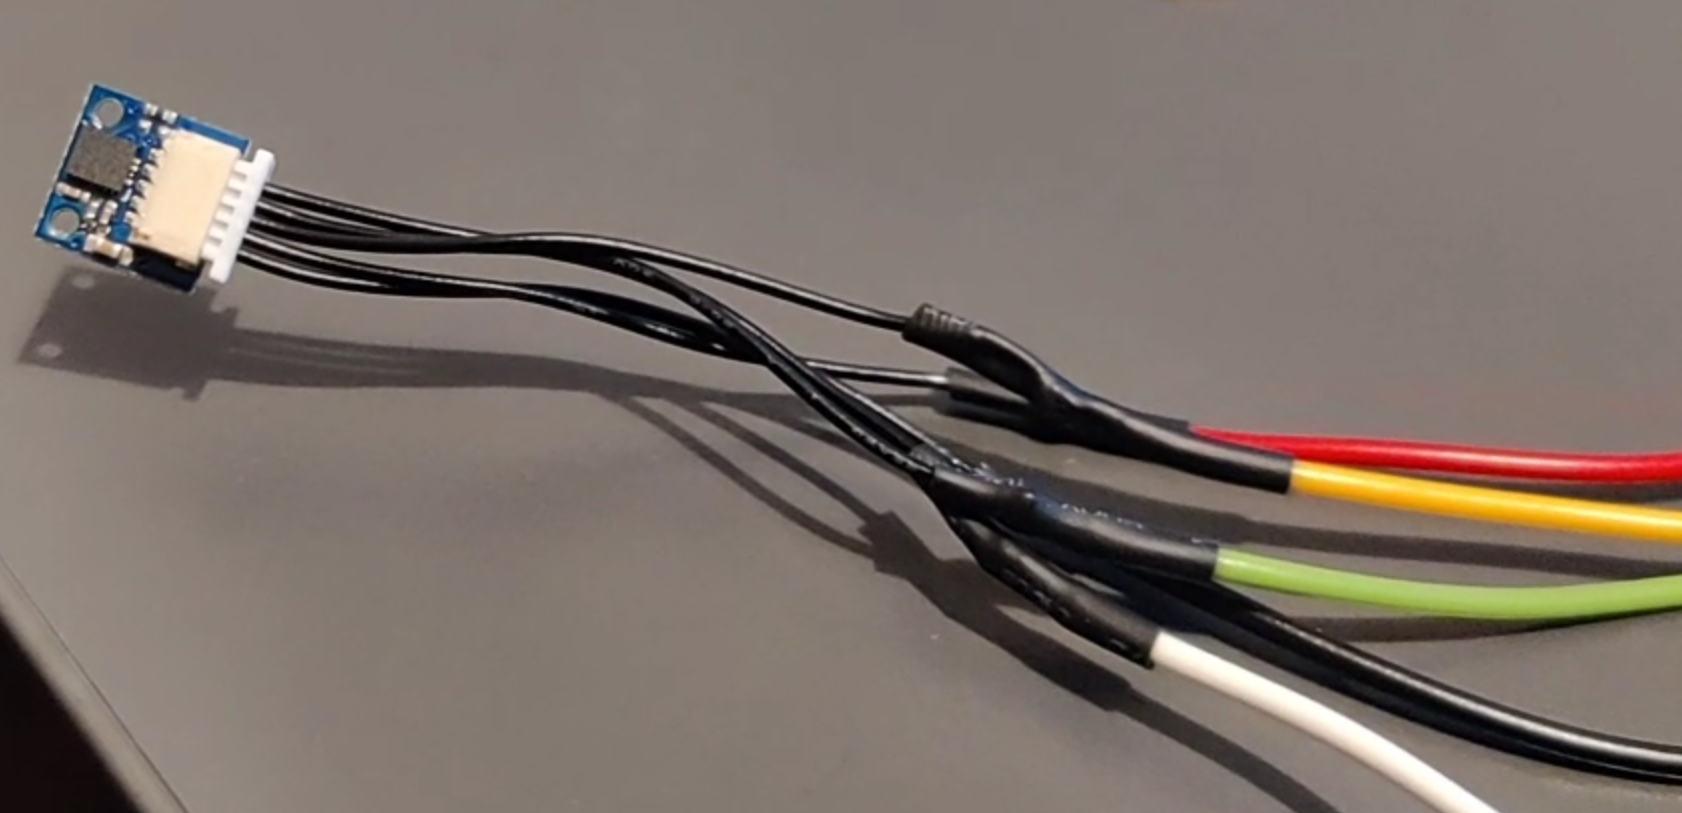
The 4 wires from the Arduino connecting to the 9-Axis through a solder to the 5-pin cable, the solder being covered by heat shrink, with the white wire at the bottom being unconnected and unused in this project.
To sum up, the parts I recommend are:
Arduino Nano 33 BLE
PowerBoost 500 Charger - Rechargeable 5V Lipo USB Boost @ 500mA+
Any 3.7-ish volt batteries, I had success with 18650s
9-Axis Sensor Wireling (Referral link)
5-Pin Wireling Cables (Referral link)
2-Pin connector (Referral link)
Once you have all the parts, you will need to wire them together; luckily, this is relatively simple. The wiring for the Arduino is shown on the right and consists of 4 wires connecting it to the external sensor and 2 wires connecting it to the power supply. I used a 5-Pin cable as I described earlier, so the wires from the Arduino simply go to the cut-off wires from the connector on that cable, with a bit of heat shrink to insulate them. I covered all of the solder on the Arduino with a 2-part putty. Any material should do here; it simply has to help insulate the solder and avoid debris from shorting them. A glue gun would probably work just as well.

The PowerBoost with the two wires at the top coming from the Arduino and showing the pins they need to connect to.
For the PowerBoost 500 side of things, you connect the 2-pin connector to the PowerBoost, and cut off the other end of the wires. I wired one end to a piece of metal that I would later glue to the wand and the other end to a spring from the battery holder of a cheap toy.
I added a power switch that I took out of the toy to the middle of one of the battery wires. This lets me turn the power off, without taking out the battery, and is an easy addition, if you feel up to it.
The black wire from the Arduino goes to either the GND pin on the PowerBoost, and the red wire goes to the pin labelled 5V. Once again, I would recommend you cover these solder with something like a 2-part putty or hot glue once you are installing it in the wand.
At this point, connecting the battery to the power supply and flipping the power switch, the Arduino should power on, and a light on it should turn on. Please note that this light will later be turned off by my code, as it uses some power and would diminish our battery life. For now, turn off the power and remove the battery while you work on other parts of the project.
Software
Plug your Arduino into your computer over USB, and if you are not planning on using the external sensor, you can simply open up my Arduino Sketch and upload it directly from the website onto your Arduino (installing Arduino Cloud Agent first).
If you do wish to use the 9-axis sensor, you have to download the sketch, open it in Arduino IDE and install the following libraries: ArduinoBLE, Arduino_LSM9DS1 and KAIST_IoT_DataScience
Once the libraries are installed, you will have to locate the Arduino_LSM9DS1 library installation on your machine. On Windows, it will be under “\Documents\Arduino\libraries\Arduino_LSM9DS1”. Here, under “src”, you should find a file called “LSM9DS1.cpp”. In this file, you need to change the lines at the beginning of the file:
#define LSM9DS1_ADDRESS            0x6b
...
#define LSM9DS1_ADDRESS_M          0x1e
So that it instead reads:
#define LSM9DS1_ADDRESS            0x6A
...
#define LSM9DS1_ADDRESS_M          0x1C
And remove the following lines at the end of the file:
#ifdef ARDUINO_ARDUINO_NANO33BLE
LSM9DS1Class IMU_LSM9DS1(Wire1);
#else

#endif
Be sure to leave in the line “LSM9DS1Class IMU_LSM9DS1(Wire);” which is located between the lines “#else” and “#endif”.
Once these changes have been made to the library, reopen the Arduino IDE and upload the code to the Arduino
At this point, whether you are using the internal or an external sensor, the program should be running, and if you install a BLE scanner app on your phone, you should be able to find it under the name “MagicWand” you can search and replace this name in the code of the wand.
I recommend replacing all of the UUIDs (Universally unique identifiers) in the program so that they are unique to your wand and no one else can start turning your lights on and off once we connect it to the smart devices.
If you search for “todo”, you should find a list of random letters of numbers, each of which should be replaced by a new one. I recommend just refreshing the page uuidgenerator.net a few times.
You will later need these UUIDs to connect to the wand from the Raspberry Pi and for it to get the data we are sending out.
Wand externals
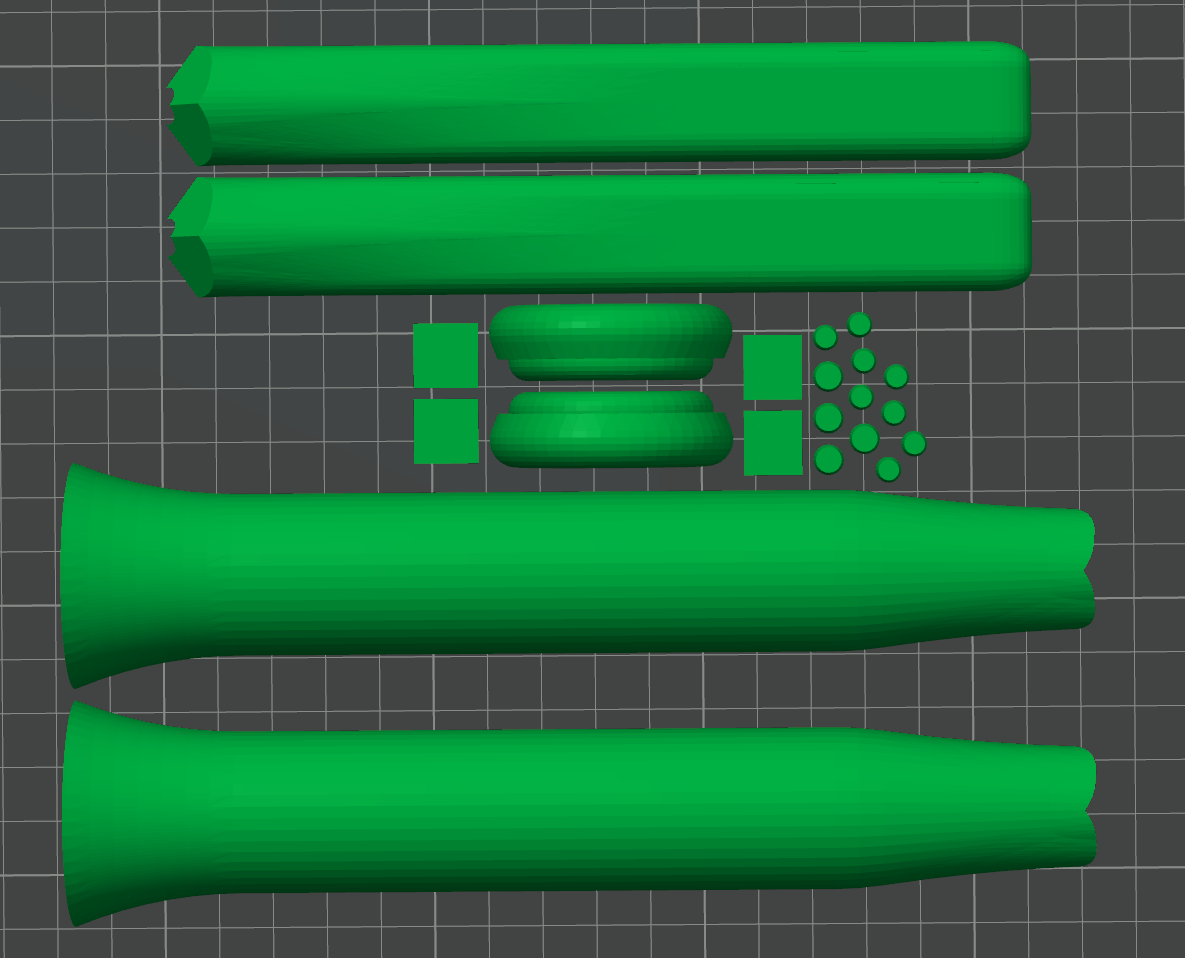
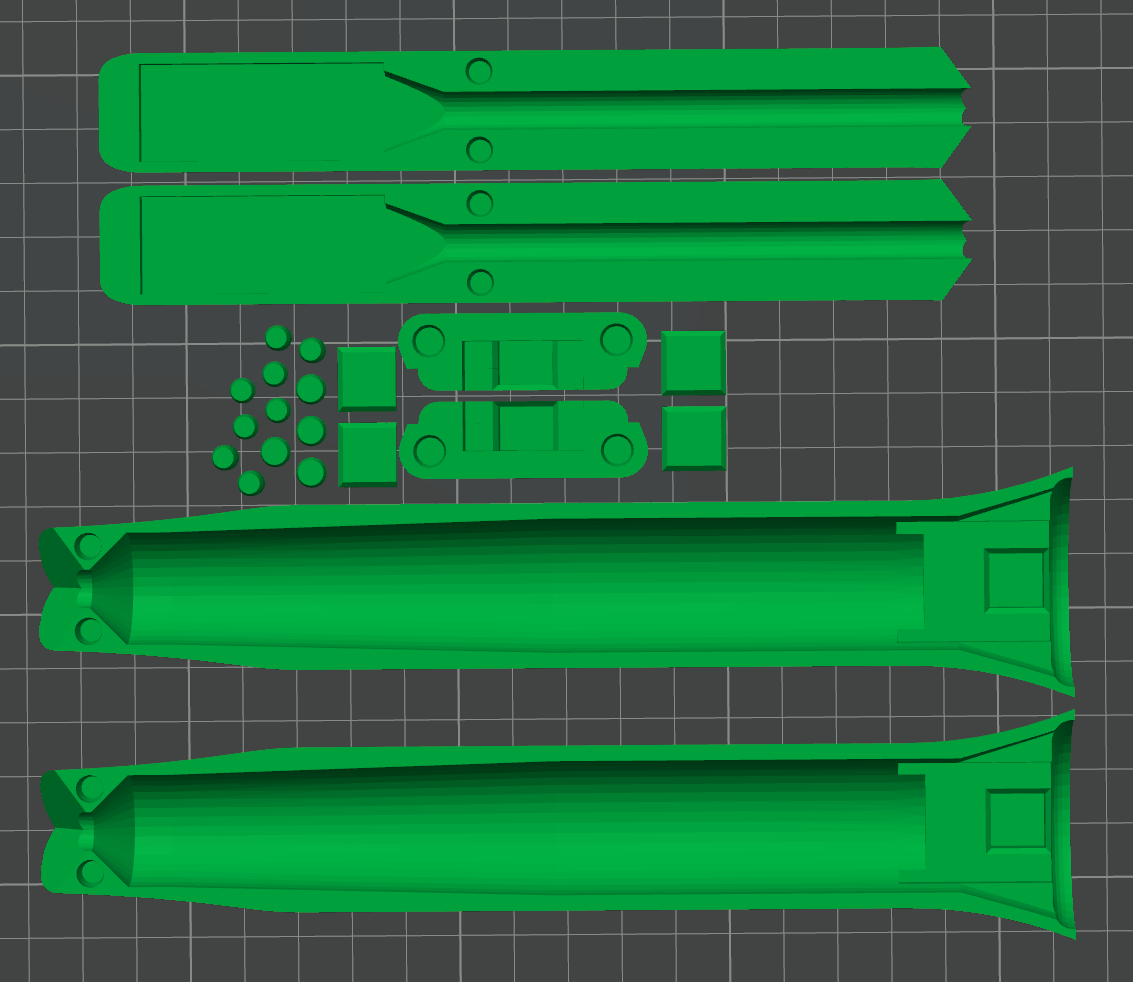
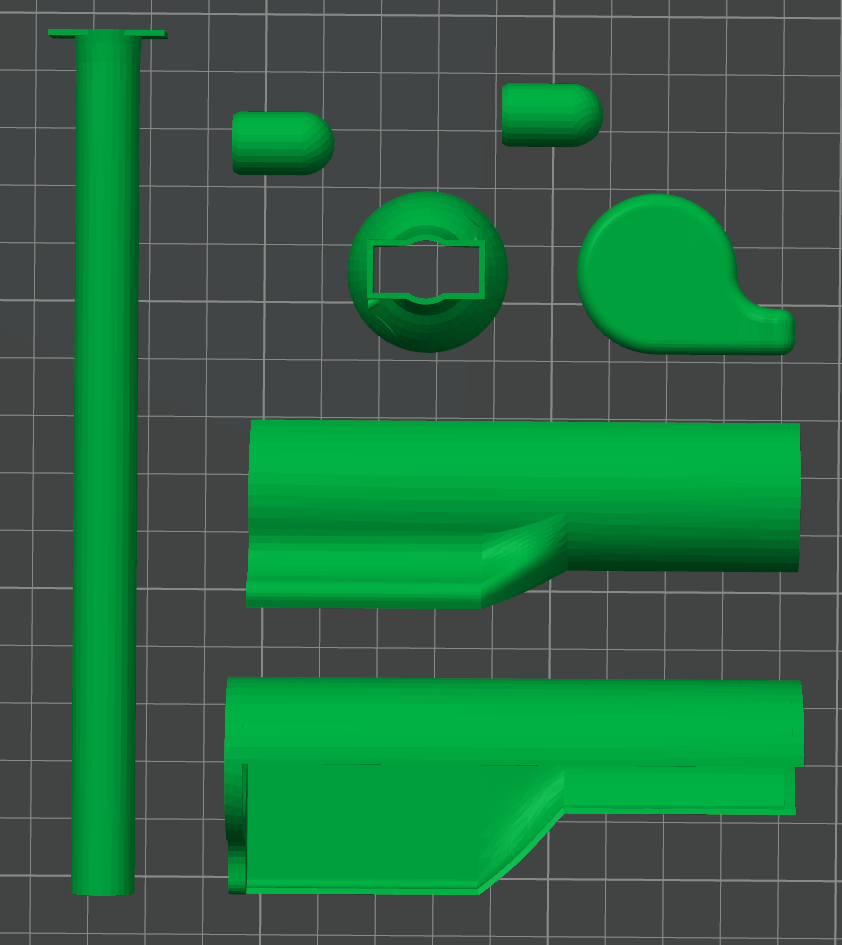
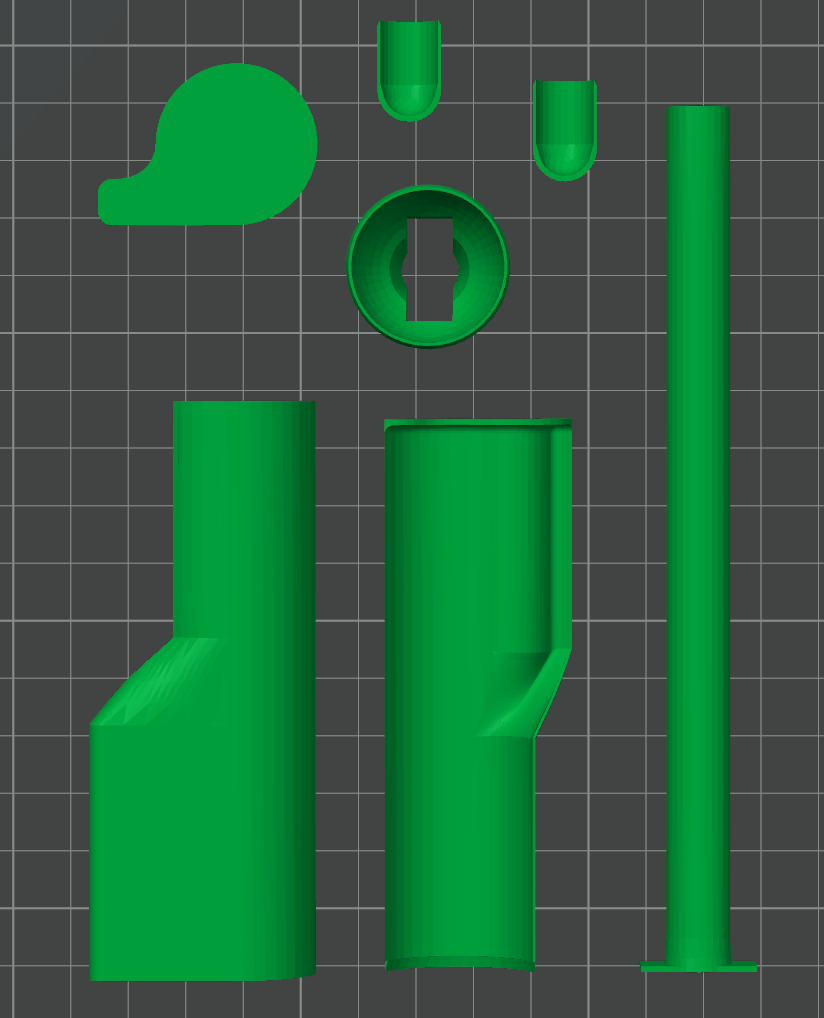
I made my wand out of a 3D printed model I designed by first modelling the internals and then drawing a shape around them to accommodate. If you wish to make your own, I would recommend doing the same. Here are the 3D models.

Arduino sensor version
The wand without an external 9-axis consists of 8 different parts, most of them printed twice, with the pegs being printed 4 times each.
The files I made for this wand can be found here, and you can see the 3d models in the gallery to the right.
The wand tip and handle halves are glued together, and each half has pegs that are glued in place. The pegs let the two halves click together.
The bottom, or “cork” as I’ve called it, is also two halves; these I glued together, and with two slots for magnets, and two magnet covers, these can be magnetised to the end of the wand, which also has two slots for magnets with magnet covers.
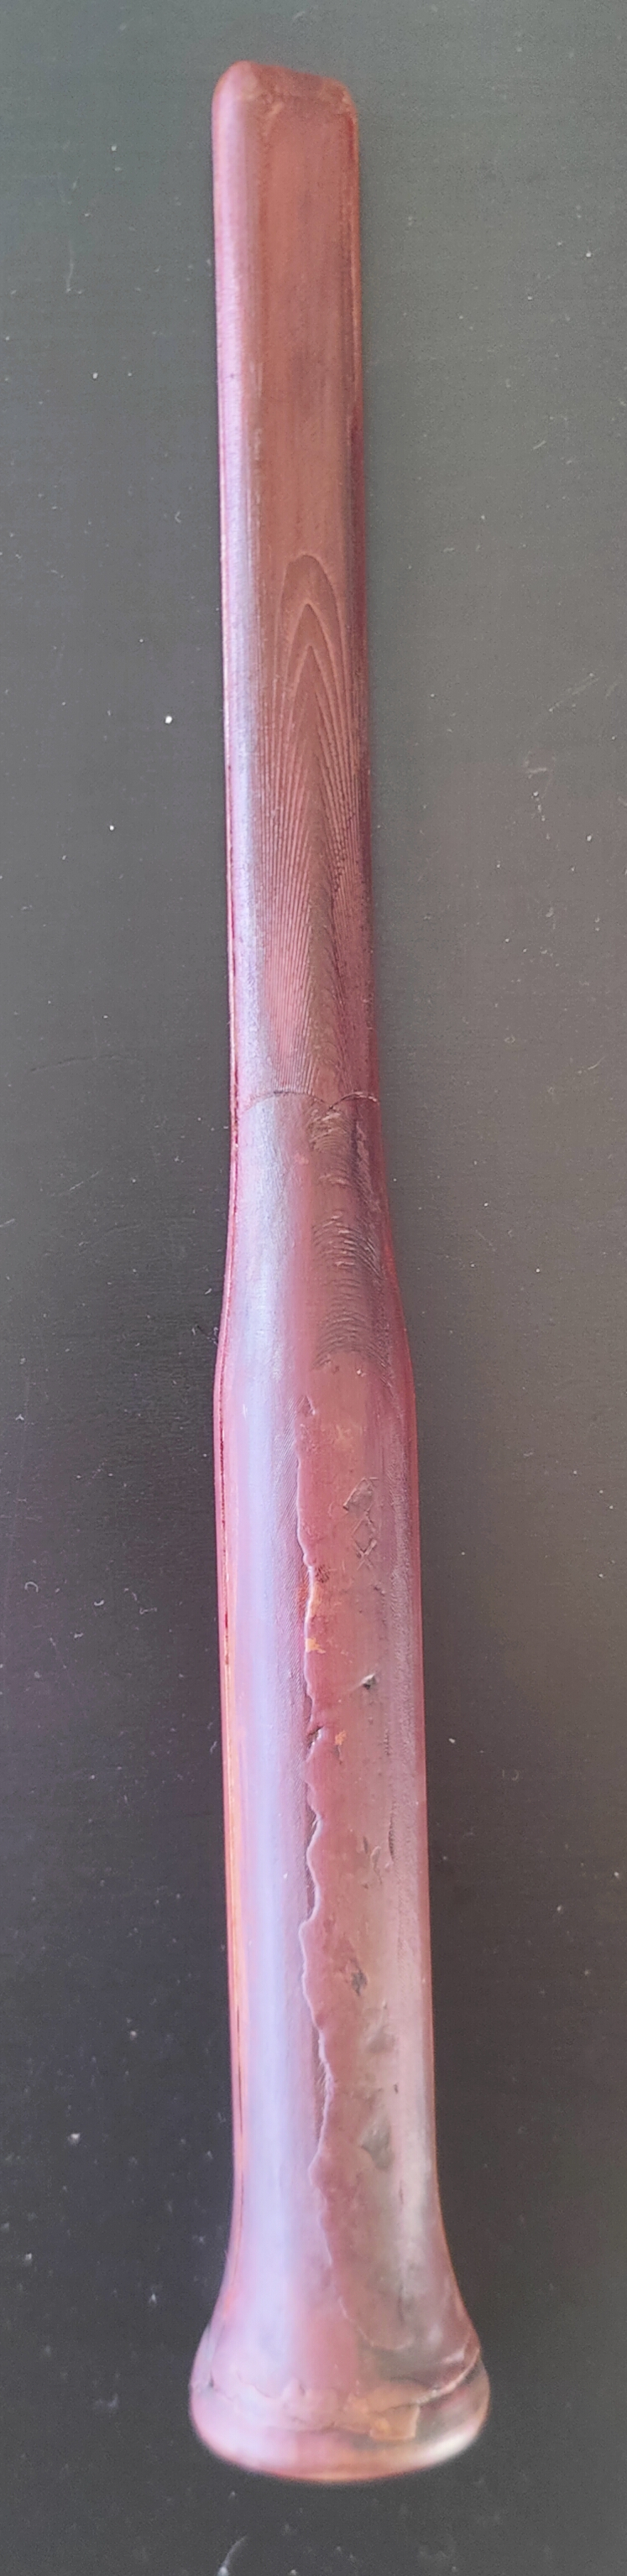
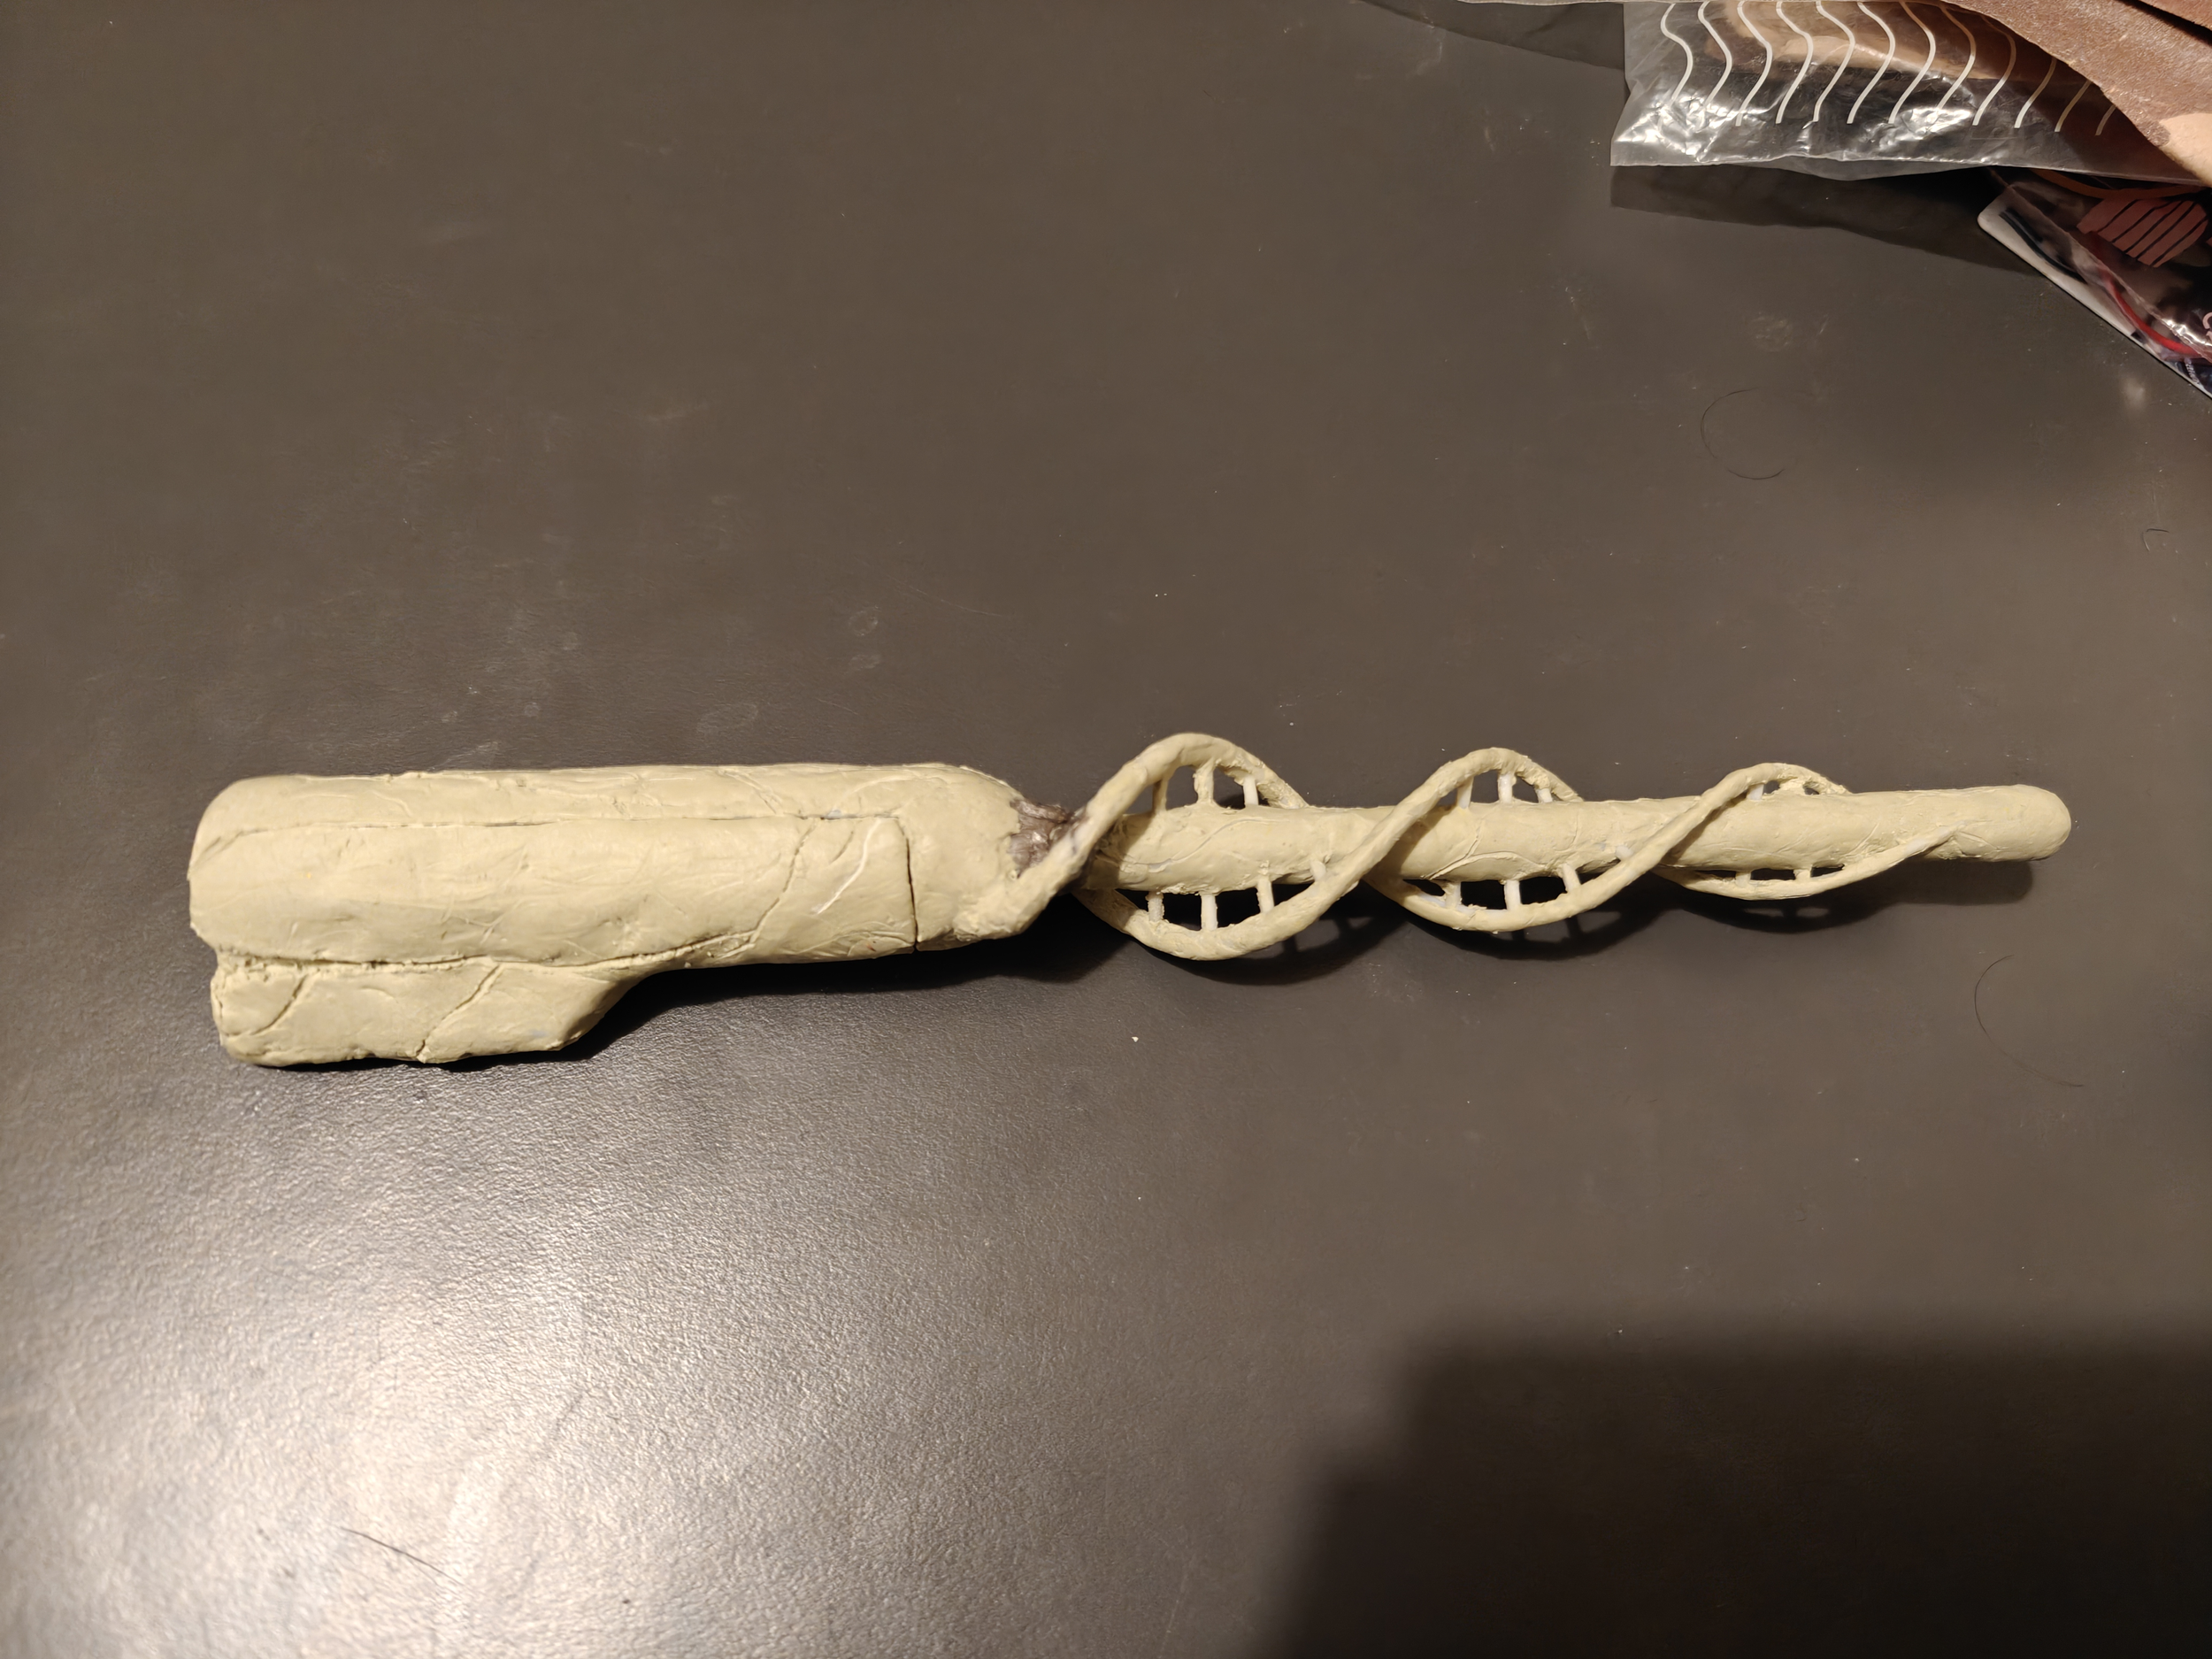
I used two-part putty to cover all seams between the 3D prints and sanded it down. There is no need to create a completely smooth finish, as it is meant to look like wood, and some blemishes can enhance the look.
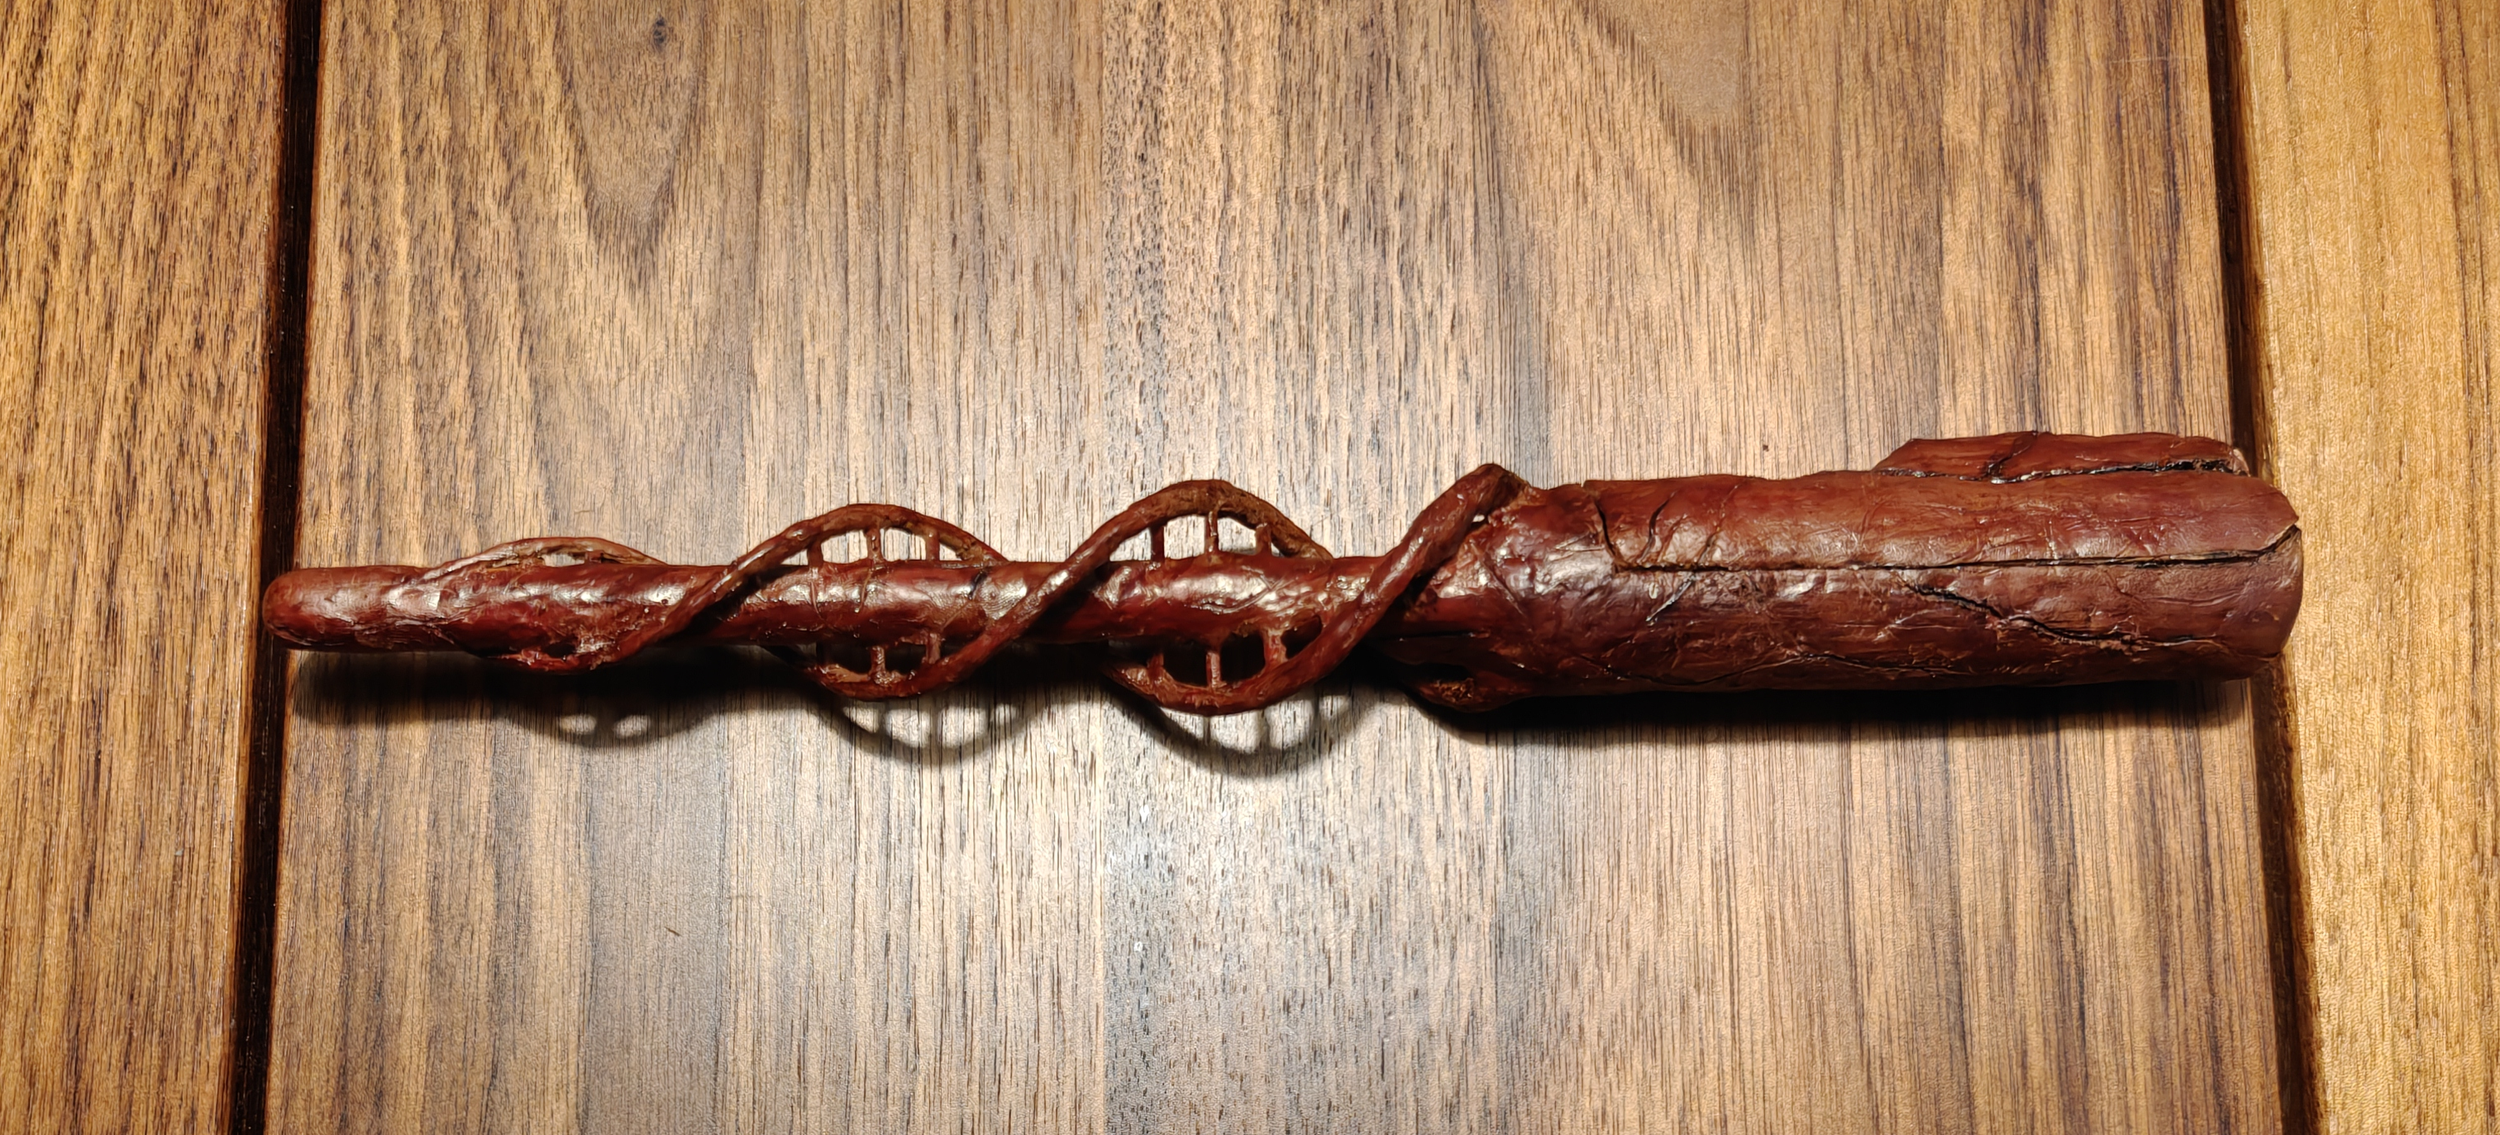
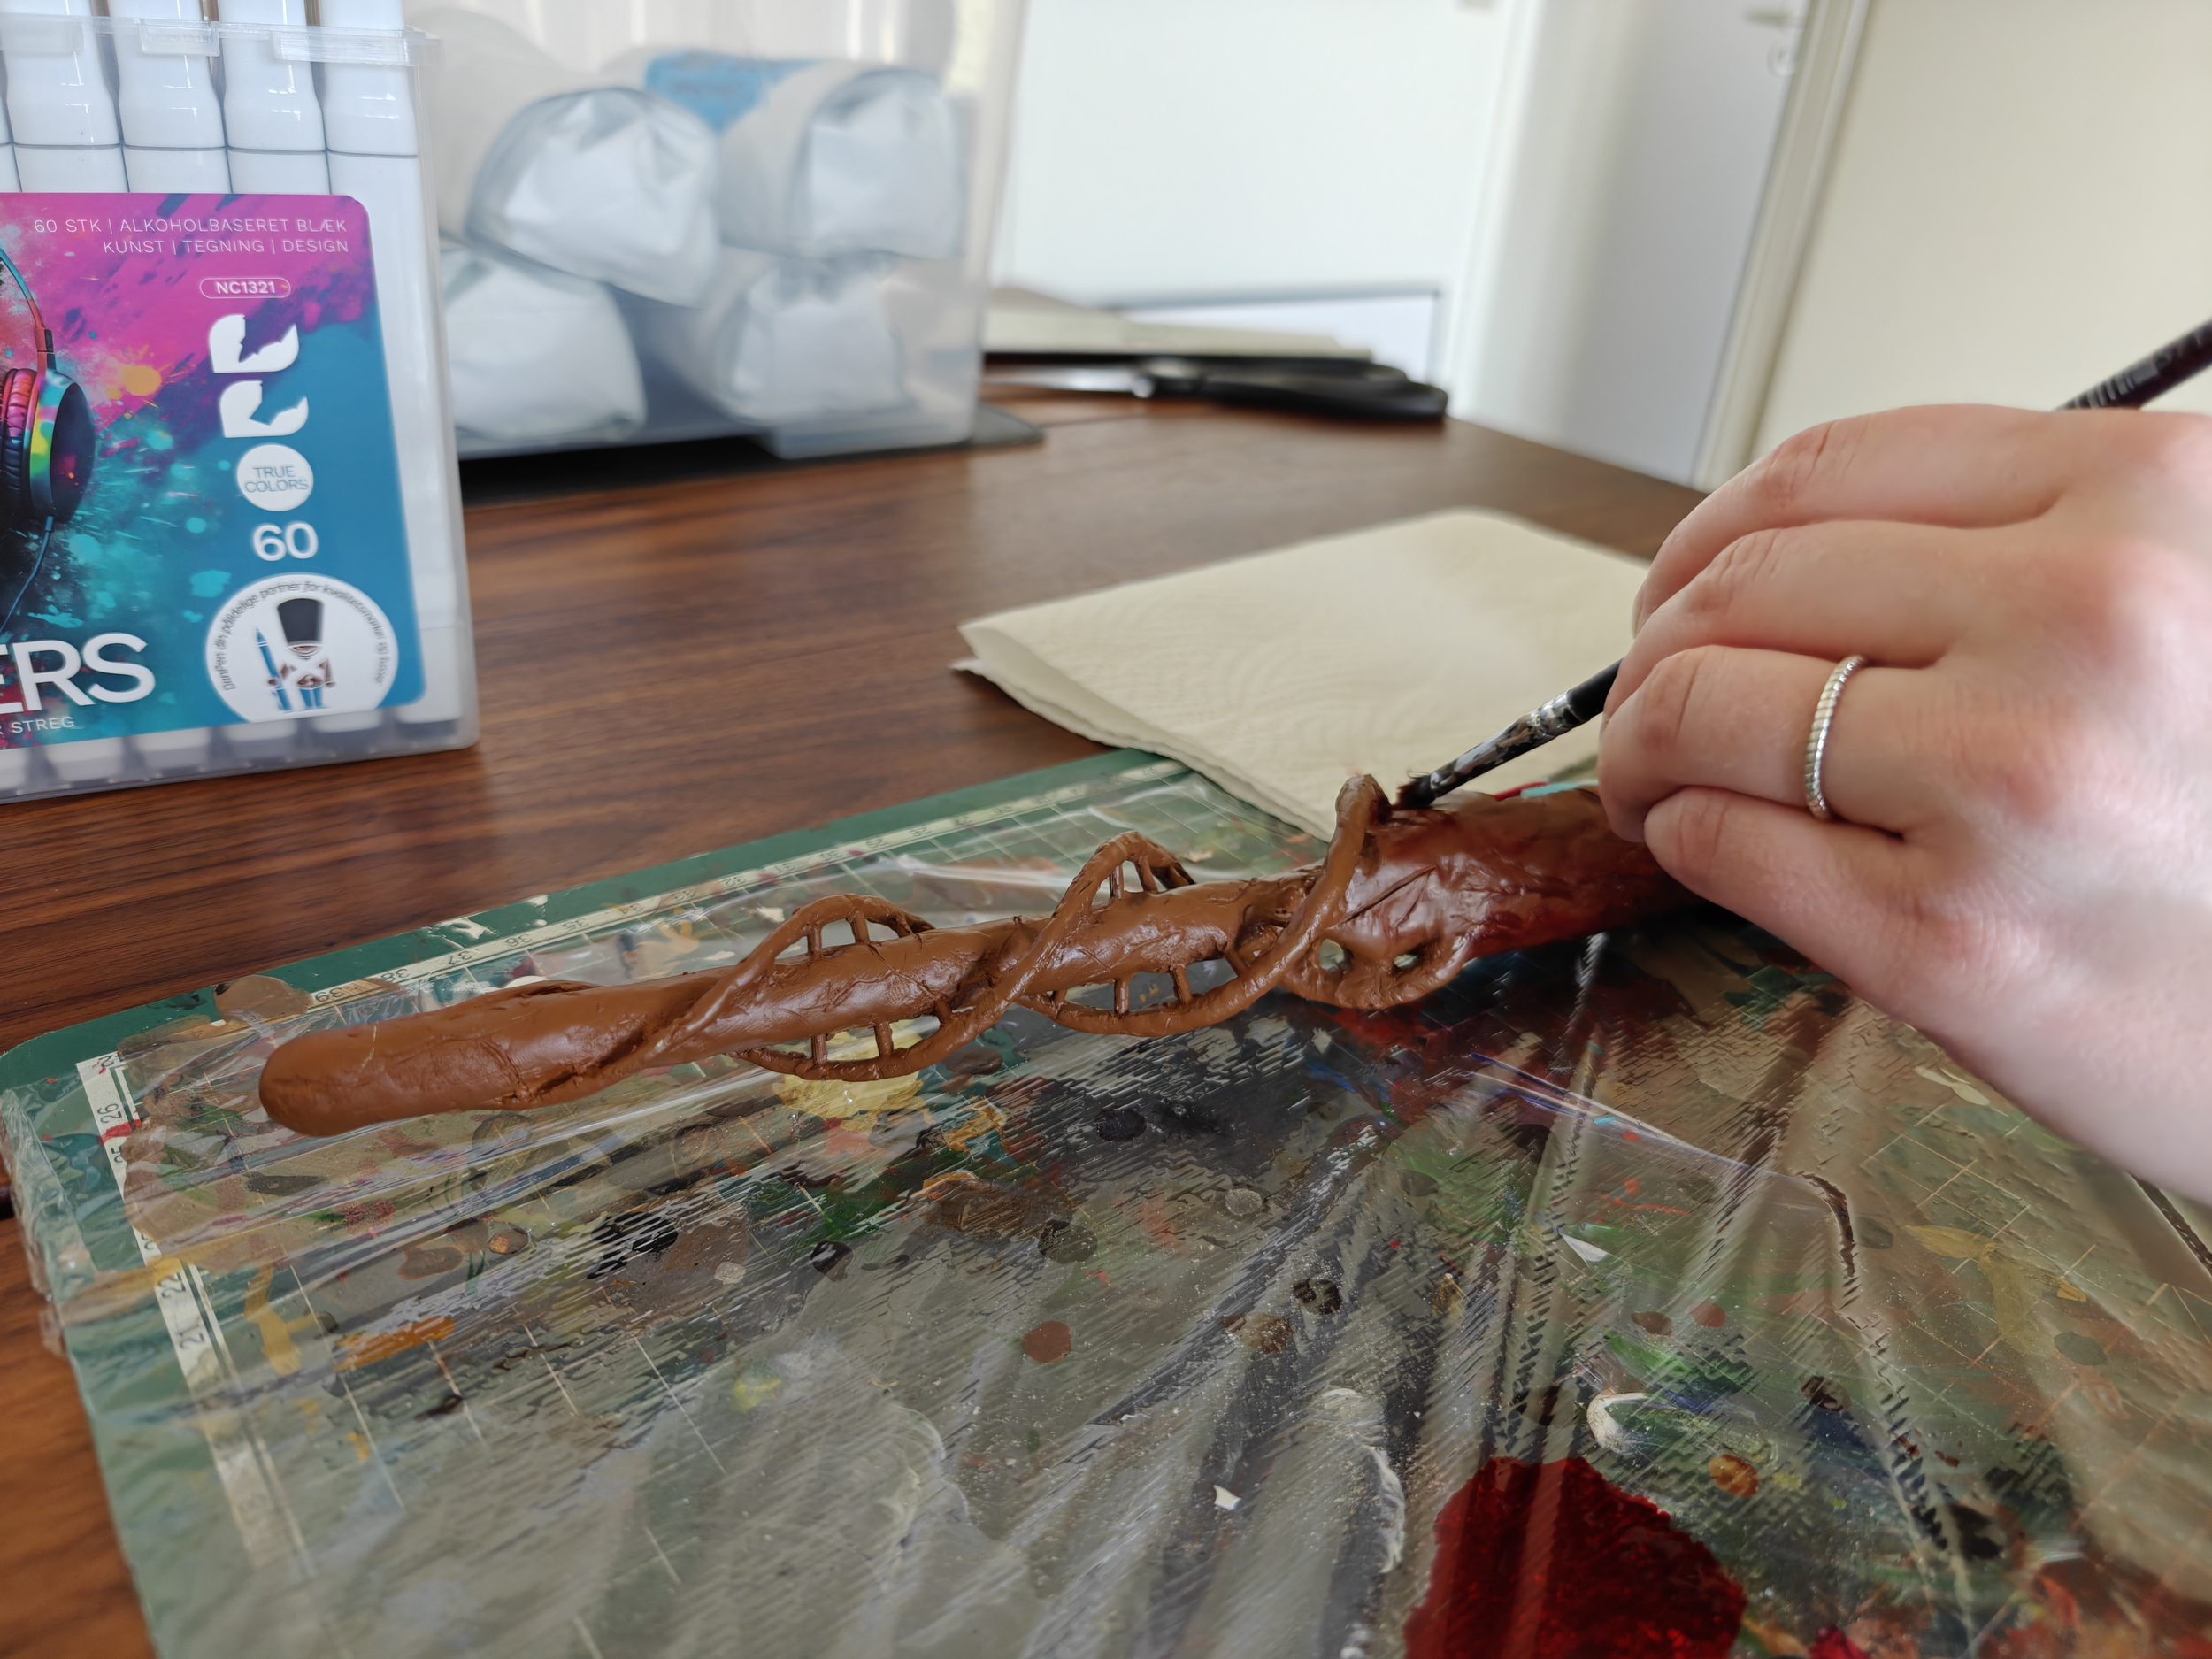
I then primed and painted the wand to make it look like wood. Here I used alcohol paint for painting the primer because these absorb into the primer and plastic slightly and make the paint job more resilient to scratches.
I could not find the paint sold alone, so I bought markers with alcohol based paint and just squeezed out a bit of paint at a time to use with my brush.


External sensor
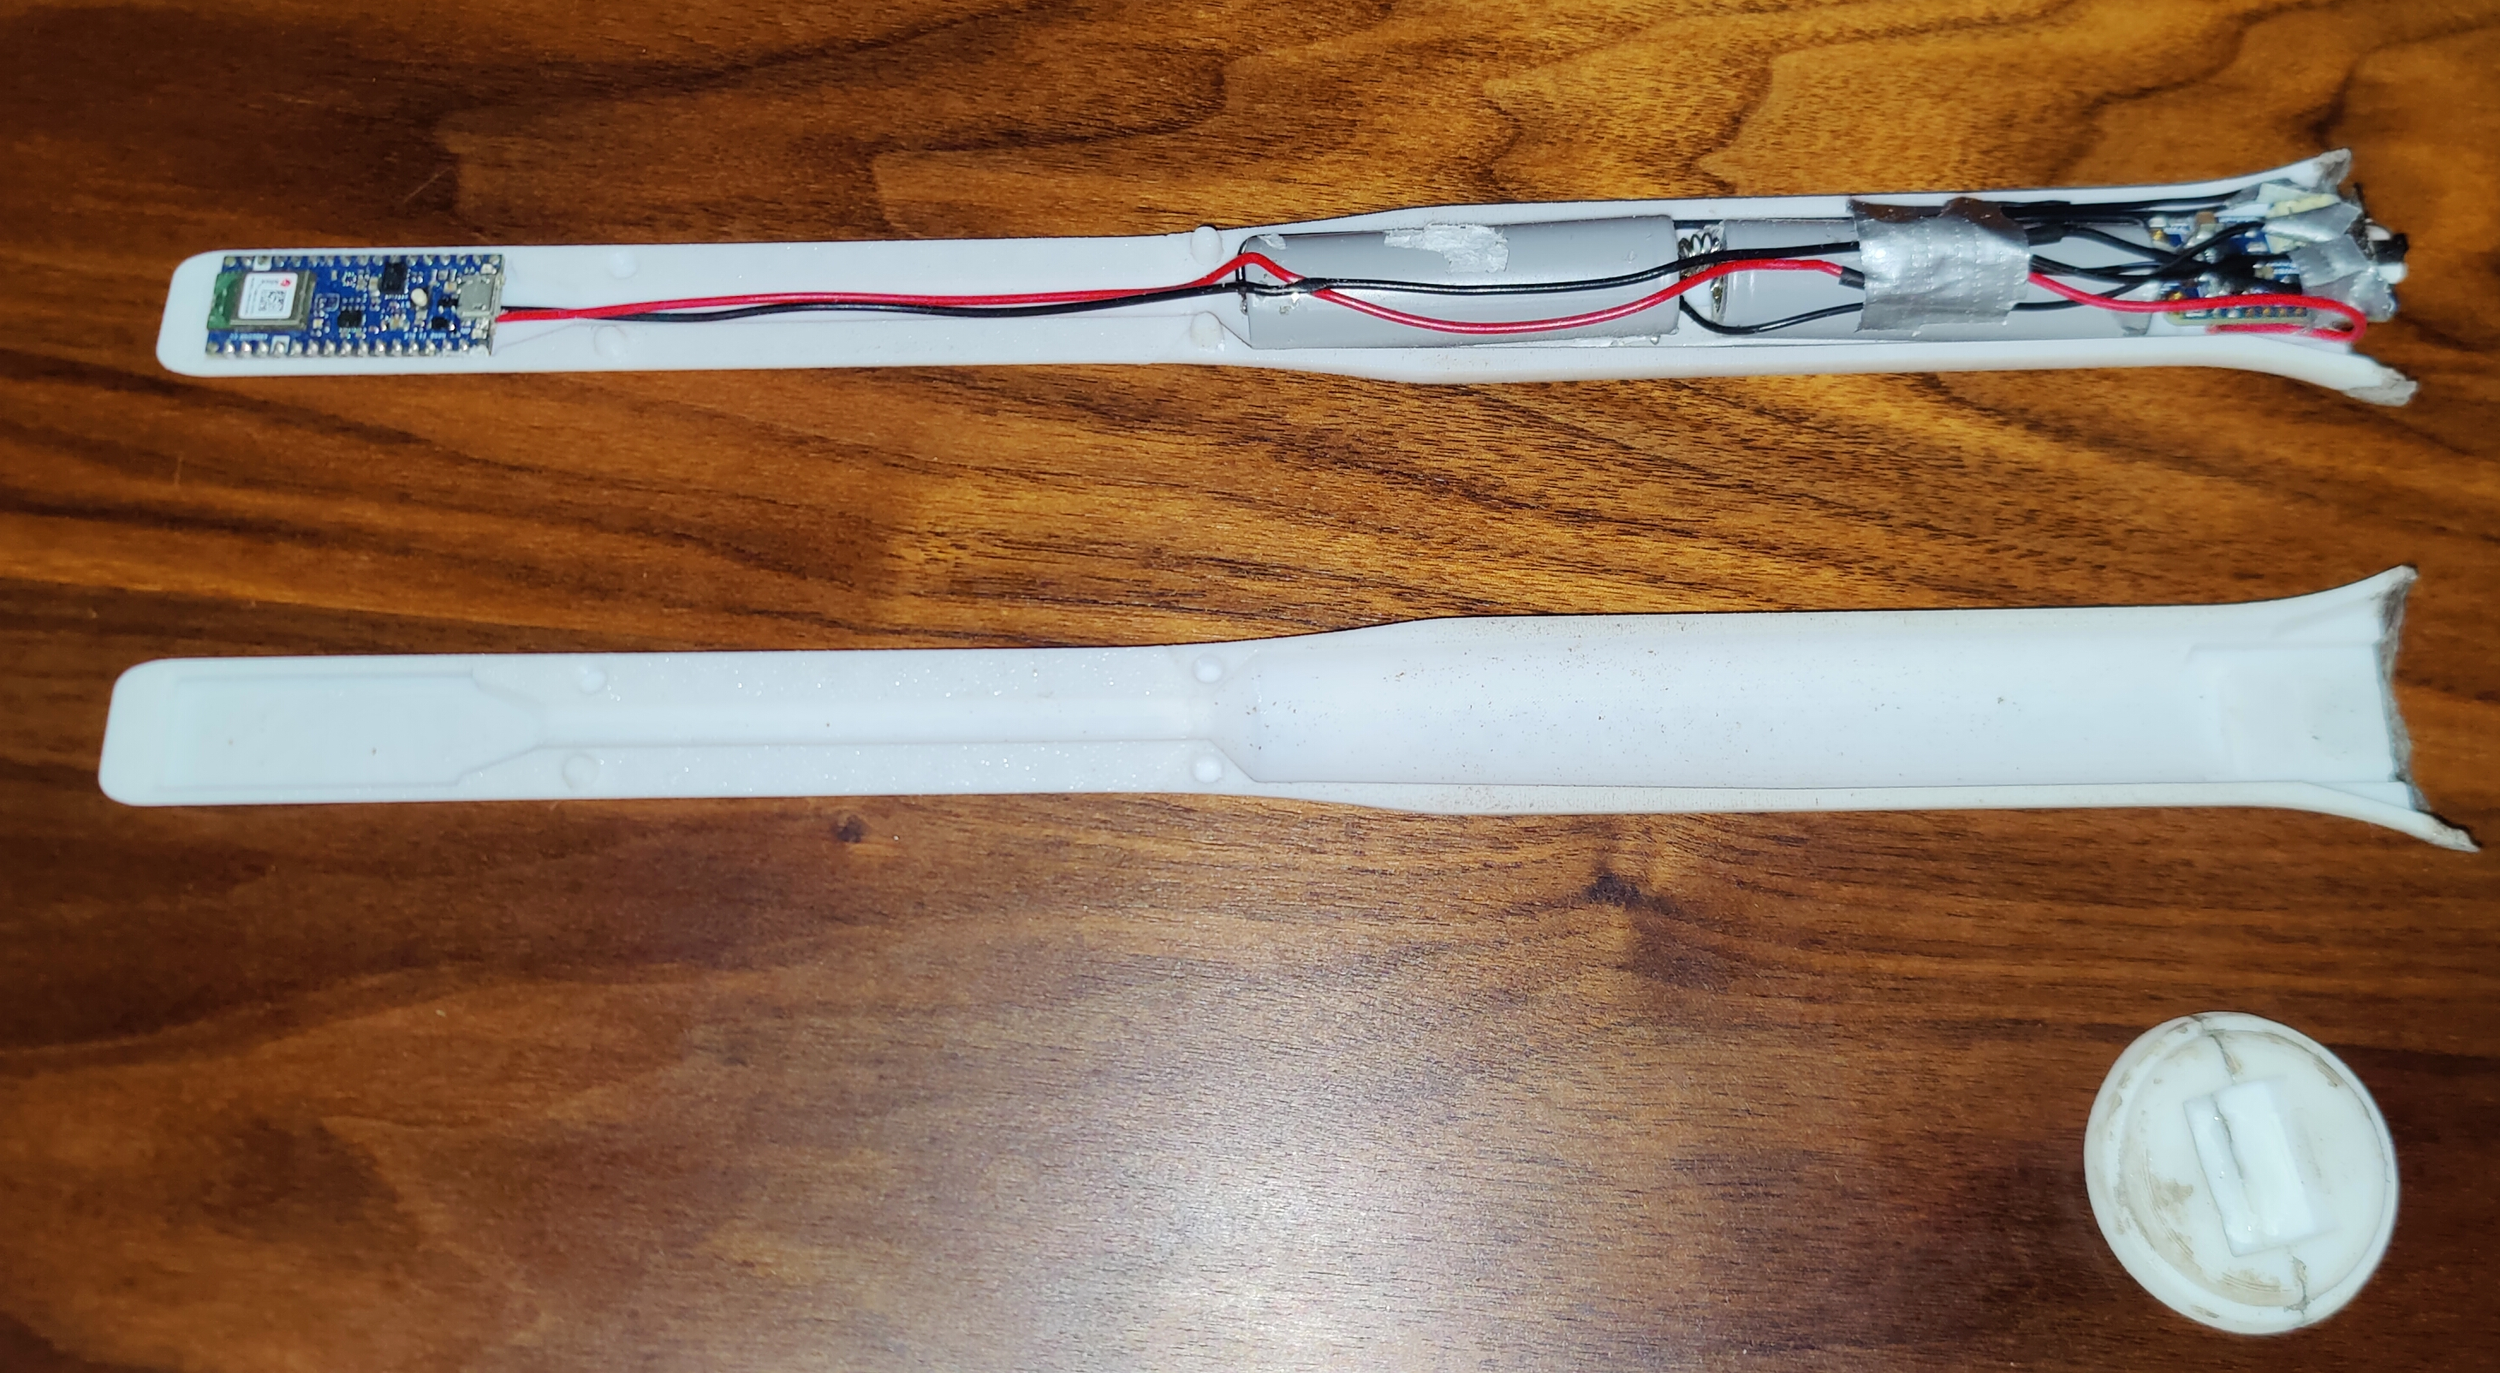
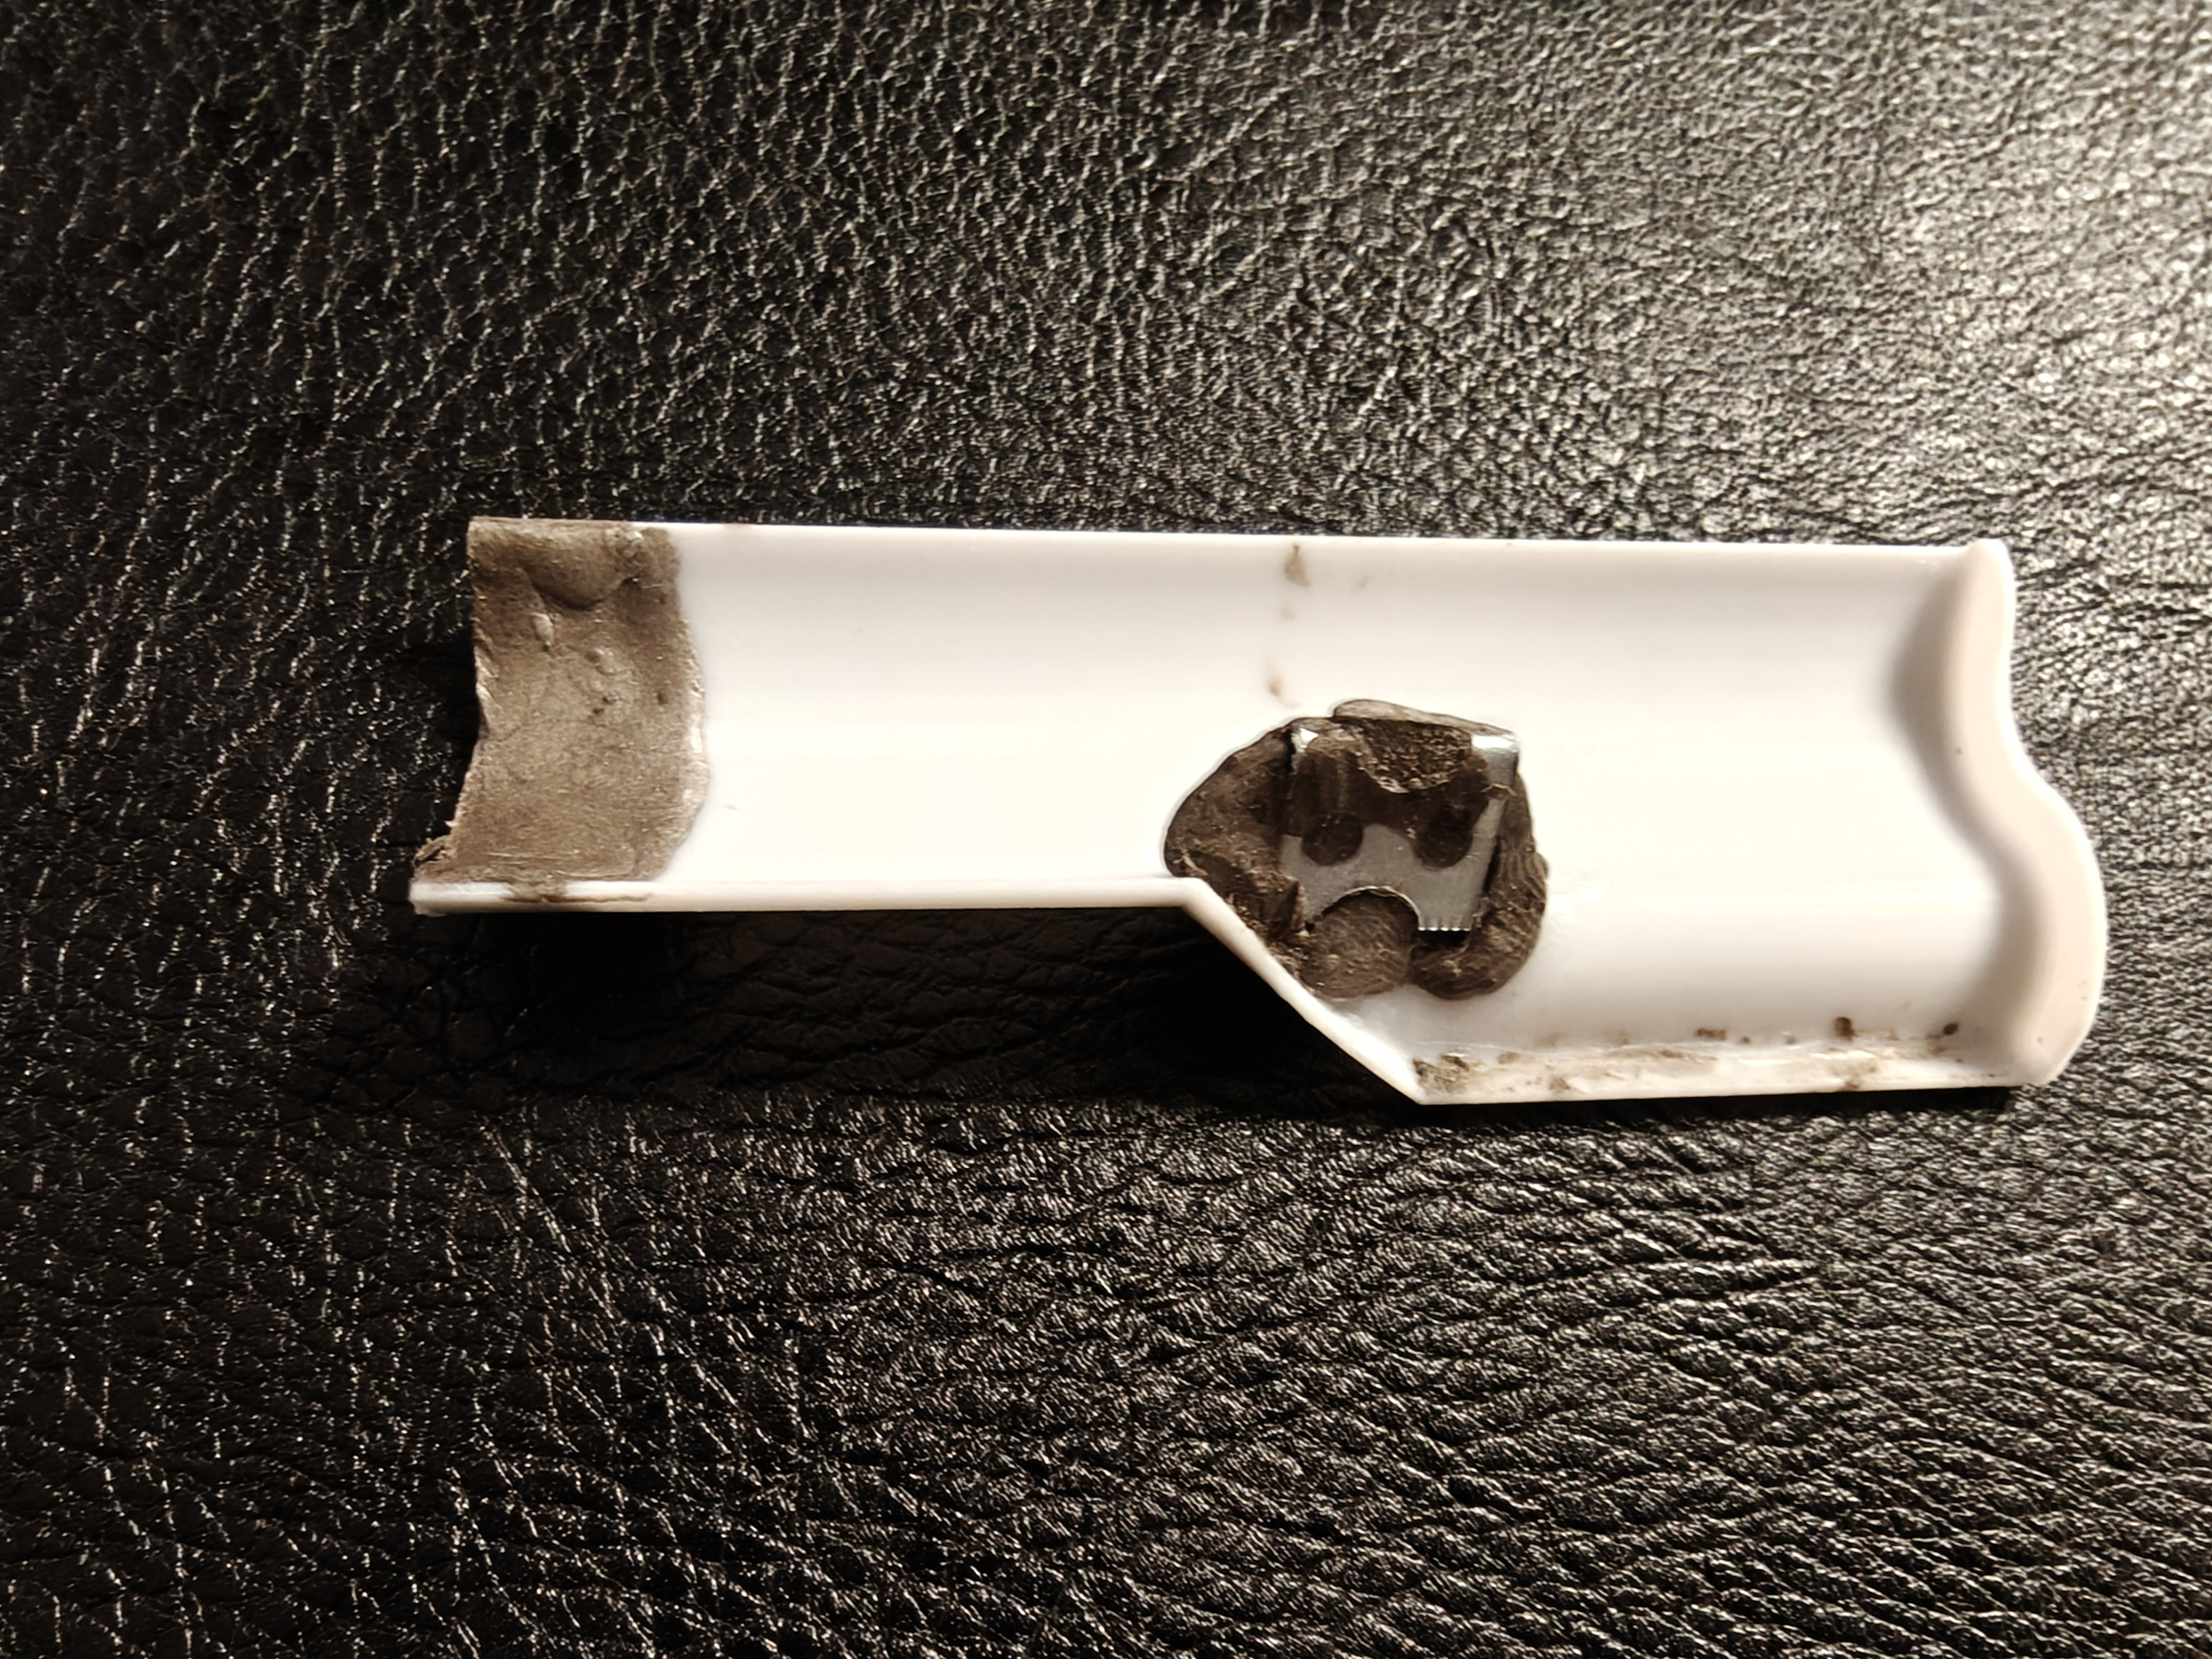
If you are making the version with the external 9-axis, the process is much the same, except this version is made to be glued together, as the Arduino is accessible through a latch. The latch is the only part of the final wand that will be held on via a single magnet located next to the PowerBoost and connecting to a piece of metal puttyed in place on the latch.
Unlike me, I recommend using anything other than “Brown Stuff sculpting putty” since I found it is ferrous and reduces the Bluetooth range of the Arduino greatly.
On the left side of the battery, I have attached a piece of metal that the wire for the PowerBoost is soldered onto, and on the right side of the battery, I am using another strip of metal with a piece of sponge glued to the back to isolate it from the Arduino and provide a softer surface for it to rest against. Between the PowerBoost and the battery on this side, I also added an on-off switch for convenience; this is just glued to the inside of the wand.
I covered every part of the print in putty and sculpted personality into the wand that way, but feel free to mess around with the 3D models and make it your own if you prefer. I have simplified this model to the bare bones to allow you to make it your own and to preserve some of what makes my girlfriend’s wand her own.
I primered and painted this wand the same way I did the previous version. Normal hobby paint primer, painted with alcohol based paint squeezed from markers.
Spell handling Raspberry Pi
Home Assistant
On the Raspberry Pi, you will need two pieces of software: one is Home Assistant, which I recommend you install in a container following this guide: Install Home Assistant Container.
There are lots of resources online on how to get your Raspberry Pi up and running, and once it is up and running, following the guide and asking questions on the forum if you get stuck should get you through.
Once you have Home Assistant up and running open it from any computer connected to the same network as the Raspberry Pi, go to Settings -> Devices & Services, here you can add integrations for the types of devices you have, this will automatically add all of the functionality of those devices to the Home Assistant app and allow you to controll those functions via scripts we are going to set up.
You will also need to go to your account (bottom left) -> Security -> Long-lived access tokens (bottom of the page), and create a token. The token will be a long piece of random text, which you will need to copy and save for later when we move to the code that communicates with the wand.
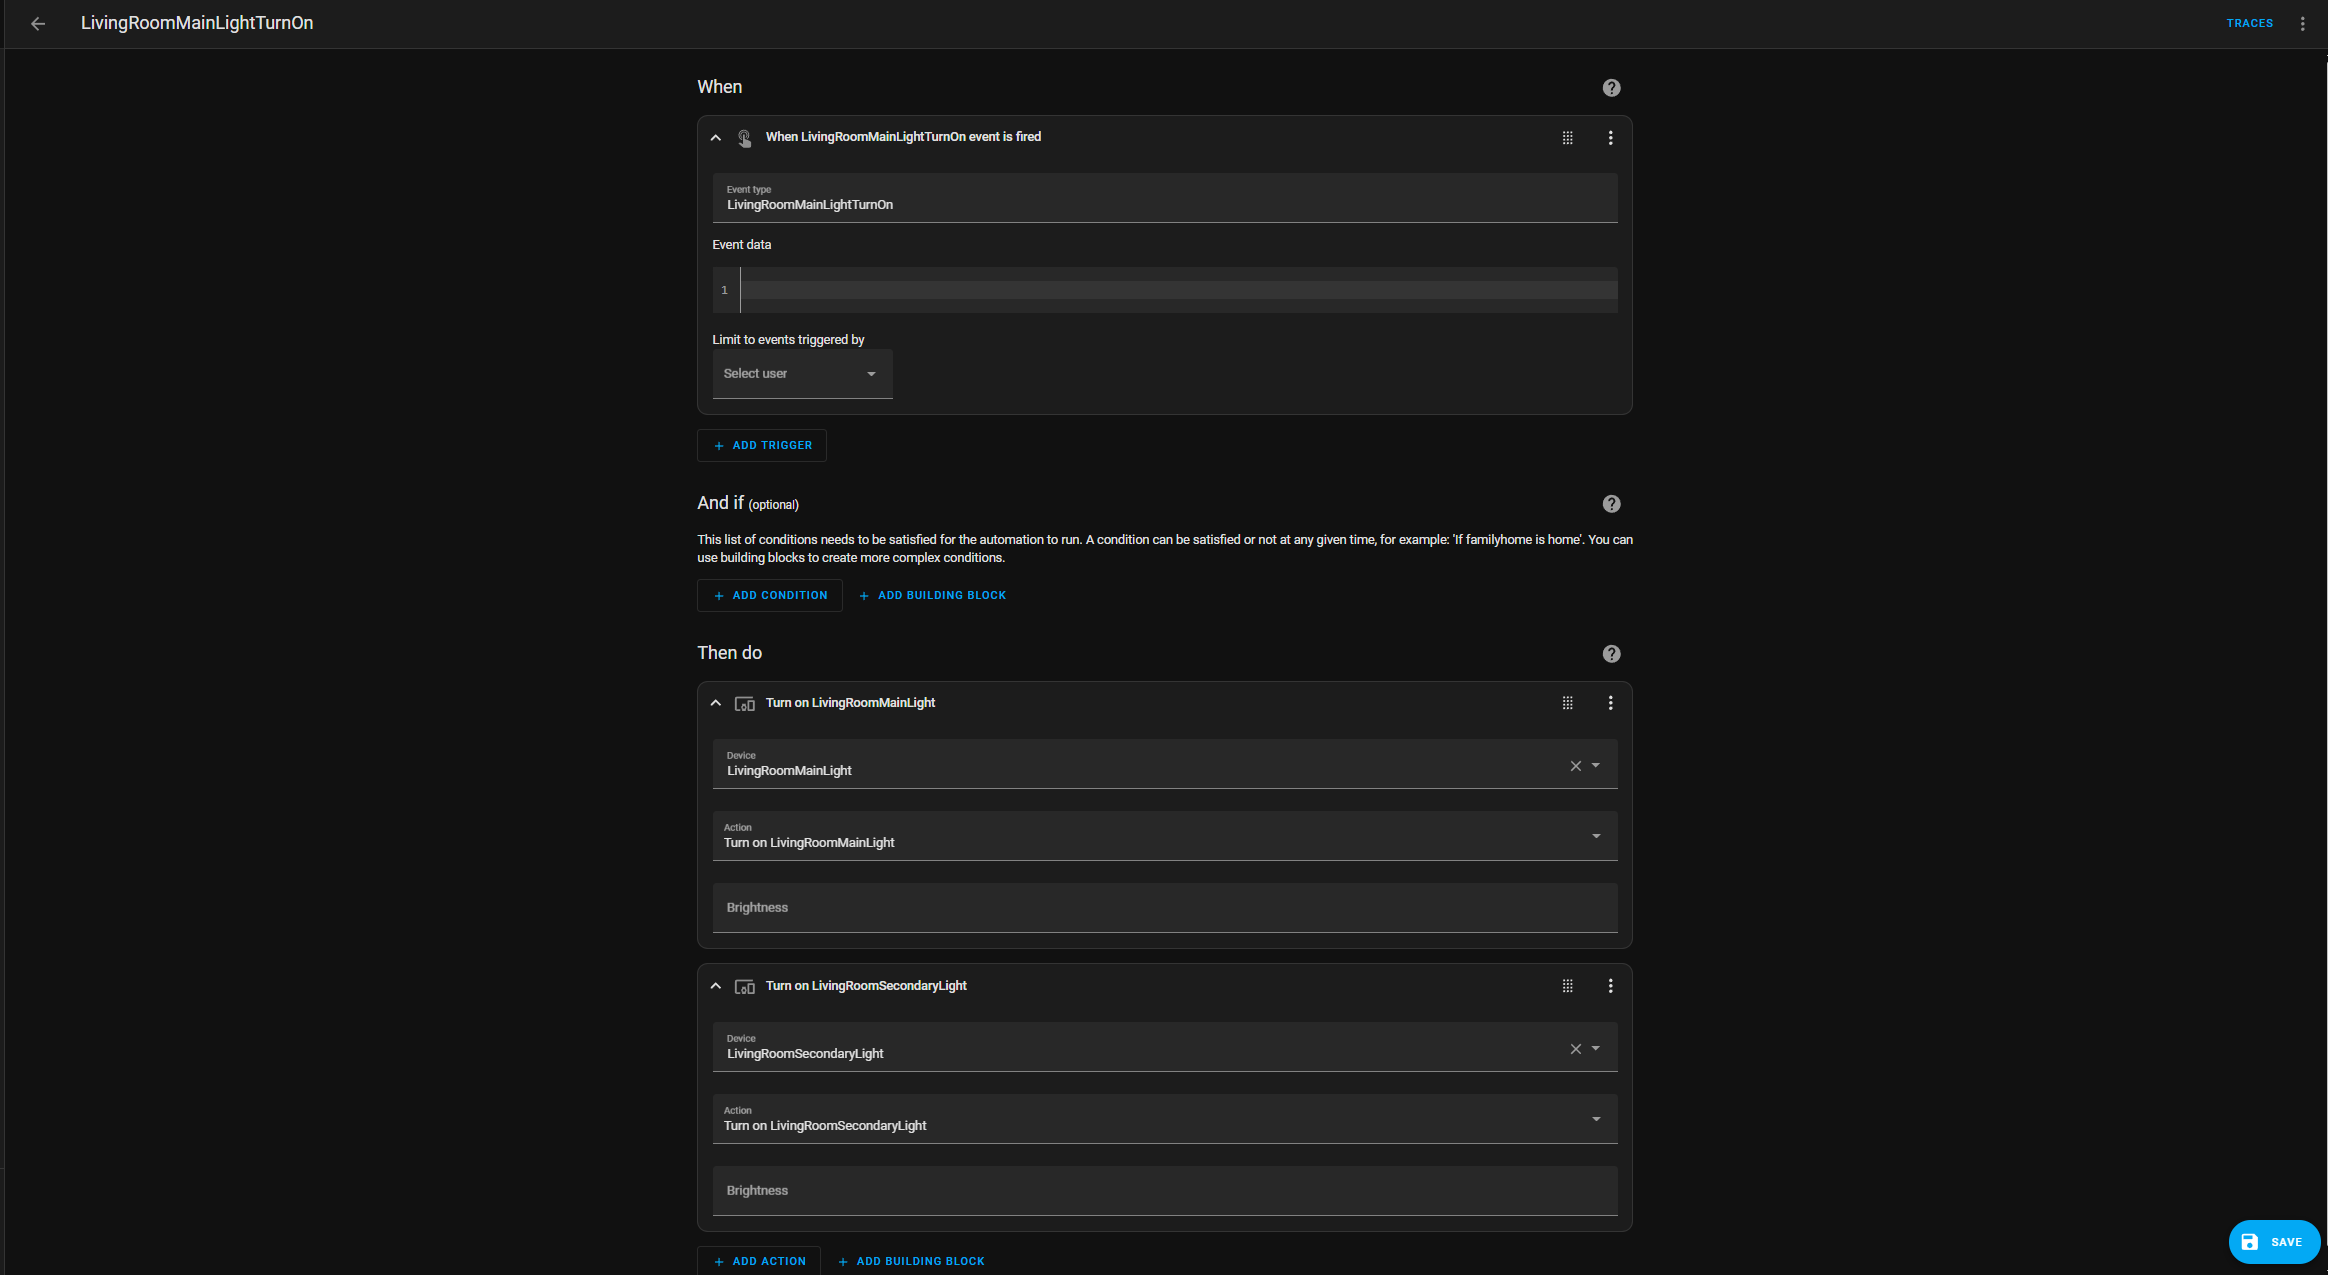
Now move into Settings -> Devices & Services -> Devices (at the top of the Devices & Services screen), open up any of your devices and press the + button next to Automations. I recommend you give your automations names in a simple structure to make it easy to generate commands for controlling them. For example, I have “LivingRoomMainLightTurnUp” and “LivingRoomMainLightTurnOn”. For the field “When”, you will need to add a trigger of the type “Manual event” and in the field Event type, use the same thing you named the automation for simplicity. Now, if Home Assistant receives a message with that text, it will run the script you set up under “Then do”. Here you can add actions to perform the task you want. I recommend starting simple.
You can test your automations right here on this screen and make sure they work the way you want them to.
from requests import post
import threading
import asyncio
from bleak import BleakClient, BleakError
import struct
import json
import time


# Define the device address and characteristics UUIDs
DEVICE_ADDRESS = "00:11:22:FF:EE:DD"

UUID_SUBSCRIBE_CHARACTERISTIC = "83d79d92-d99b-45f3-86f3-246dafbae585"
UUID_STROKE_CHARACTERISTIC = "26410220-1fb0-41f5-8a33-1042783047fa"

STROKE_POINT_COUNT = 160

# Variables to store the values of the characteristics
spell = None

spellList = ['Arresto Momentum', 'Ascendo', 'Bedroom', 'Descendo', 'Livingroom', 'Lumos', 'Nox', 'Revelio', 'Silenco', "Totus Obscurum"]


spellChain = []
startedThreads = []

# Stroke Collector Class
class StrokeCollector:
    def __init__(self):
        self.strokes = []
        self.previous_state = 0
        self.filename = "gestures.json"
        self.sensor = {
            'data': {},
            'structure': [],
            'rendered': False
        }

    def process_ble_data(self, data):
        try:
            if len(data) != 328:
                print("Invalid data length")
                return

            # Unpack state (Int32) and length (Int32) from first 8 bytes
            state, length = struct.unpack('<ii', data[:8])

            # Validate stroke length (max 160 points = (328-8)/2)
            max_points = 160
            if length < 0 or length > max_points:
                print(f"Invalid stroke length: {length}")
                return

            # Extract stroke data starting after header (8 bytes)
            stroke_start = 8
            stroke_end = stroke_start + (length * 2)
            stroke_data = data[stroke_start:stroke_end]

            # Process points from the correct offset
            points = []
            for ptr in range(0, len(stroke_data), 2):
                # Read signed 8-bit values (-128 to 127)
                x = struct.unpack_from('<b', stroke_data, ptr)[0] / 128.0
                y = struct.unpack_from('<b', stroke_data, ptr + 1)[0] / 128.0
                points.append({'x': x, 'y': y})

            # Handle stroke completion (state 2 = ended)
            if state == 2 and self.previous_state != 2:
                self.strokes.append({
                    "index": len(self.strokes),
                    "strokePoints": points,
                    "label": ""
                })
                self.save_to_file()
                print(f"Saved stroke {len(self.strokes)} with {len(points)} points")

            self.previous_state = state
        except struct.error as se:
            print(f"Unpack error: {str(se)}")
        except Exception as e:
            print(f"Processing error: {str(e)}")

    def save_to_file(self):
        try:
            with open(self.filename, 'w') as f:
                json.dump({"strokes": self.strokes}, f, indent=2)
        except Exception as e:
            print(f"Save error: {str(e)}")

# Function to handle notifications from the subscribed characteristic
async def notification_handler(sender, data, client):
    global spell

    # spellChar is an unsigned char (1 byte), so we unpack the first byte
    spellNumber = struct.unpack('B', data)[0]
    spell = spellList[spellNumber]
    take_spell_action(spell)
    print(f"Notification received from {sender}: {spell}")
    print(spellChain)


async def monitor_strokes(client, collector):
    try:
        stroke_char = client.services.get_characteristic(UUID_STROKE_CHARACTERISTIC)
        while client.is_connected:
            data = await client.read_gatt_char(stroke_char)
            collector.process_ble_data(data)
            await asyncio.sleep(0.2)
    except Exception as e:
        print(f"Stroke monitoring error: {str(e)}")

# Function to connect, read the characteristics, and subscribe to notifications
async def connect_and_subscribe():
    global spell
    collector = StrokeCollector()

    error = False
    while True:
        try:
            async with BleakClient(DEVICE_ADDRESS) as client:
                print(f"Connected to {DEVICE_ADDRESS}")

                # Subscribe to notifications from the specified characteristic
                await client.start_notify(UUID_SUBSCRIBE_CHARACTERISTIC, lambda sender, data: asyncio.create_task(notification_handler(sender, data, client)))

                asyncio.create_task(monitor_strokes(client, collector))

                error = False

                # Keep the connection alive and handle reconnections if disconnected
                while True:
                    if not client.is_connected:
                        print("Connection lost. Reconnecting...")
                        break
                    await asyncio.sleep(1)  # Check the connection status periodically

        except BleakError as e:
            if not error:
                print(f"Connection error: {e}")
                error = True
        except Exception as e:
            print(f"Unexpected error: {e}")

        # Wait a moment before trying to reconnect
        await asyncio.sleep(5)

# Main entry point to start the BLE connection loop
async def main():
    await connect_and_subscribe()


class Room:
  def __init__(self, name, devices):
    self.name = name
    self.devices = devices


class Device:
  def __init__(self, name, dType):
    self.name = name
    self.dType = dType
    self.commands = populate_commands(dType)


class LocationSpell:
  def __init__(self, location, time):
    self.location = location
    self.time = time


def populate_commands(dType):
    if dType == "Light":
      return ["TurnOff", "TurnOn", "TurnUp", "TurnDown", "Halt"]
    elif dType == "Curtain":
      return ["Close", "Open", "Halt"]
    elif dType == "TV":
      return ["TurnOff", "TurnOn", "VolumeUp", "VolumeDown", "Mute", "Pause"]


rooms = [
  Room("Bedroom", [
    Device("MainLight", "Light"),
    Device("Television", "TV"),
    Device("BlackoutCurtain", "Curtain")
  ]),
  Room("LivingRoom", [
    Device("MainLight", "Light"),
    #Device("SecondaryLight", "Light"),
    Device("Television", "TV"),
  ]),
  Room("Office", [
    Device("MainLight", "Light")
  ])
]

dividingDistance = 100
multiplier = 4
locationSpellLockTime = 300
lastLocationSpell = LocationSpell(rooms[1], time.time() - 3600)

currentDistance = 100
lastSpellTime = time.time()


stop_threads = False
previousLocation = rooms[0]


def guess_at_location():
  #return rooms[2]
  timeSinceLocationSpell = time.time() - lastLocationSpell.time
  if timeSinceLocationSpell < locationSpellLockTime: #location spell cast in the last 5 minutes
    return lastLocationSpell.location
  certaintyBasedOnDistance = currentDistance - dividingDistance #possitive is one room, negative is another
  dist = abs(certaintyBasedOnDistance)
  if (dist > 6000 / timeSinceLocationSpell): #if the distance justifies prioritizing it over the last lock
    if certaintyBasedOnDistance > 0:
      return rooms[0]
    else:
      return rooms[1]
  else:
    return lastLocationSpell.location

url = "http://localhost:8123/api/events/"
headers = {
  "Authorization": "Bearer
  #todo insert your unique code here
  ",
  "content-type": "application/json",
}

def trigger_event(eventName, payload={}):
  post(url + eventName, headers=headers, data=payload)
  print(url + eventName)

def take_spell_action(spell):
  global stop_threads
  global lastSpellTime
  global startedThreads
  global previousLocation
  if time.time() - lastSpellTime > 120:
    spellChain.clear()
  lastSpellTime = time.time()


  if spell == "Bedroom":
    lastLocationSpell.time = time.time()
    lastLocationSpell.location = rooms[0]
    previousLocation = rooms[0]
    spellChain.clear()
    trigger_event(
          "Bedroom" + "RoomSelected"
        )
  elif spell == "Livingroom":
    lastLocationSpell.time = time.time()
    lastLocationSpell.location = rooms[1]
    previousLocation = rooms[1]
    spellChain.clear()
    trigger_event(
          "LivingRoom" + "RoomSelected"
        )
  elif spell == "Office":
    lastLocationSpell.time = time.time()
    lastLocationSpell.location = rooms[2]
    previousLocation = rooms[2]
    spellChain.clear()
  elif spell == "Lumos":
    spellChain.clear()
    spellChain.append(spell)
    location = guess_at_location()
    previousLocation = location
    for device in location.devices:
      if device.dType == "Light":
        trigger_event(
          location.name + device.name + device.commands[1]
        )
  elif spell == "Nox":
    spellChain.clear()
    spellChain.append(spell)
    location = guess_at_location()
    previousLocation = location
    for device in location.devices:
      if device.dType == "Light":
        trigger_event(
          location.name + device.name + device.commands[0]
        )
  elif spell == "Ascendo":
    if "Lumos" in spellChain:
      for device in previousLocation.devices:
        if device.dType == "Light":
          trigger_event(
              previousLocation.name + device.name + device.commands[2]
            )
    if "Muffilato" in spellChain or "Silenco" in spellChain or "Patronus" in spellChain or "Revelio" in spellChain:
      for device in previousLocation.devices:
        if device.dType == "TV":
          trigger_event(
              previousLocation.name + device.name + device.commands[2]
            )


    if "Muffilato" in spellChain or "Silenco" in spellChain:
      for device in previousLocation.devices:
        if device.dType == "TV":
          trigger_event(
              previousLocation.name + device.name + device.commands[2]
            )

  elif spell == "Descendo":
    if "Lumos" in spellChain:
      for device in previousLocation.devices:
        if device.dType == "Light":
          trigger_event(
              previousLocation.name + device.name + device.commands[3]
            )

    if "Muffilato" in spellChain or "Silenco" in spellChain or "Patronus" in spellChain or "Revelio" in spellChain:
      for device in previousLocation.devices:
        if device.dType == "TV":
          trigger_event(
              previousLocation.name + device.name + device.commands[3]
            )

  elif spell == "Arresto Momentum":
    if "Diffindo" in spellChain or "Colorpotus" in spellChain:
      for device in previousLocation.devices:
        if device.dType == "Curtain":
          trigger_event(
            previousLocation.name + device.name + device.commands[2]
          )
    if "Lumos" in spellChain:
      for device in previousLocation.devices:
        if device.dType == "Light":
          trigger_event(
            previousLocation.name + device.name + device.commands[4]
          )
    if "Revelio" in spellChain or "Patronus" in spellChain:
      for device in previousLocation.devices:
        if device.dType == "TV":
          trigger_event(
            previousLocation.name + device.name + device.commands[5]
          )

  elif spell == "Muffilato":
    spellChain.clear()
    spellChain.append(spell)
    location = guess_at_location()
    previousLocation = location

  elif spell == "Silenco":
    spellChain.clear()
    spellChain.append(spell)
    location = guess_at_location()
    previousLocation = location
    for device in location.devices:
      if device.dType == "TV":
        trigger_event(
          location.name + device.name + device.commands[4]
        )

  elif spell == "Patronus" or spell == "Revelio":
    spellChain.clear()
    spellChain.append(spell)
    location = guess_at_location()
    previousLocation = location
    for device in location.devices:
      if device.dType == "TV":
        trigger_event(
          location.name + device.name + device.commands[1]
        )
  elif spell == "Disillusionment":
    spellChain.clear()
    spellChain.append(spell)
    location = guess_at_location()
    previousLocation = location
    for device in location.devices:
      if device.dType == "TV":
        trigger_event(
          location.name + device.name + device.commands[0]
        )
  elif spell == "Diffindo":
    spellChain.clear()
    spellChain.append(spell)
    location = guess_at_location()
    previousLocation = location
    for device in location.devices:
      if device.dType == "Curtain":
        trigger_event(
          location.name + device.name + device.commands[1]
        )
  elif spell == "Colorpotus":
    spellChain.clear()
    spellChain.append(spell)
    location = guess_at_location()
    previousLocation = location
    for device in location.devices:
      if device.dType == "Curtain":
        trigger_event(
          location.name + device.name + device.commands[0]
        )
  elif spell == "Obscuro":
    take_spell_action("Disillusionment")
    take_spell_action("Colorpotus")
  elif spell == "Totus Obscurum":
    take_spell_action("Disillusionment")
    take_spell_action("Nox")
    take_spell_action("Colorpotus")
  elif spell == "":
    pass


if __name__ == "__main__":
    asyncio.run(main())


#take_spell_action("Office")
#time.sleep(2)
#take_spell_action("Nox")
#time.sleep(2)
#take_spell_action("Lumos")
#time.sleep(2)
#take_spell_action("Descendo")
#time.sleep(8)
#take_spell_action("Arresto Momentum")

#print(spellChain)
#trigger_event("OfficeMainLightTurnOn")
Python code
The last piece of this project is my Python code, which communicates with the wand and calls actions on the Home Assistant.
In my code, you will need to define the “DEVICE_ADDRESS = “00:11:22:FF:EE:DD”” with the Bluetooth device address of your Arduino, and replace the 2 UUIDs if you replaced the ones in the Arduino script, such that they are the same. Then you need to paste the Token you got from Home Assistant into the place I have marked with “#Todo” such that it reads:
"Authorization": "Bearer YOUR TOKEN HERE",
as in:
"Authorization": "Bearer nokgoiqf1Ha0fhfAQ0iA0912rjn0fni0i10ir0if1j0...",Now you can replace the rooms I have defined:
rooms = [
  Room("Bedroom", [
    Device("MainLight", "Light"),
    Device("Television", "TV"),
    Device("BlackoutCurtain", "Curtain")
  ]),
  Room("LivingRoom", [
    Device("MainLight", "Light"),
    #Device("SecondaryLight", "Light"),
    Device("Television", "TV"),
  ]),
  Room("Office", [
    Device("MainLight", "Light")
  ])
]
These will need to be replaced with the rooms you have and the devices you wish to control in them. Lastly ,the logic inside
def take_spell_action(spell):will need to be replaced with whatever logic you wish to use to control your devices. Make sure the
trigger_event(…)is sending the exact name of your automations in Home Assistant.
At this point, you should be able to use the wand, and each time you do, it should save a new stroke to the file “gestures.json”, which you can then name and use to retrain your model.
Adding your own spells and wand data.
Getting data
import tkinter as tk
from tkinter import ttk, filedialog, messagebox
from matplotlib.backends.backend_tkagg import FigureCanvasTkAgg
import matplotlib.pyplot as plt
import json
import os
import glob
import datetime


class StatsWindow(tk.Toplevel):
    def __init__(self, parent):
        super().__init__(parent)
        self.title("Data Statistics")
        self.geometry("800x600")

        # Configure main container
        self.main_frame = ttk.Frame(self)
        self.main_frame.pack(fill=tk.BOTH, expand=True, padx=10, pady=10)

        # Directory selection
        self.dir_frame = ttk.Frame(self.main_frame)
        self.dir_frame.pack(fill=tk.X, pady=5)

        self.select_dir_btn = ttk.Button(
            self.dir_frame,
            text="Select Directory",
            command=self.load_directory
        )
        self.select_dir_btn.pack(side=tk.LEFT, padx=5)

        self.dir_label = ttk.Label(self.dir_frame, text="No directory selected")
        self.dir_label.pack(side=tk.LEFT, padx=5)

        # Plot area
        self.plot_frame = ttk.Frame(self.main_frame)
        self.plot_frame.pack(fill=tk.BOTH, expand=True, pady=10)

        # Information panel
        self.info_frame = ttk.Frame(self.main_frame)
        self.info_frame.pack(fill=tk.X, pady=10)

        self.stats_label = ttk.Label(
            self.info_frame,
            text="Select a directory to analyze data distribution",
            wraplength=700
        )
        self.stats_label.pack()

        # Initialize plot
        self.fig, self.ax = plt.subplots(figsize=(8, 4))
        self.canvas = FigureCanvasTkAgg(self.fig, master=self.plot_frame)
        self.canvas.get_tk_widget().pack(fill=tk.BOTH, expand=True)

    def load_directory(self):
        directory = filedialog.askdirectory()
        if not directory:
            return

        self.current_directory = directory
        self.dir_label.config(text=directory)
        self.analyze_data()

    def analyze_data(self):
        valid_labels = [
            "Arresto Momentum", "Ascendo", "Bedroom", "Descendo",
            "Livingroom", "Lumos", "Nox", "Revelio", "Silenco", "Totus Obscurum"
        ]
        counts = {label: 0 for label in valid_labels}
        file_count = 0

        # Process files
        for filename in os.listdir(self.current_directory):
            if filename.startswith("disapproved") or not filename.endswith(".json"):
                continue

            filepath = os.path.join(self.current_directory, filename)
            try:
                with open(filepath, 'r') as f:
                    data = json.load(f)
                    file_count += 1
                    for stroke in data.get("strokes", []):
                        label = stroke.get("label", "")
                        if label in counts:
                            counts[label] += 1
            except Exception as e:
                print(f"Error processing {filename}: {e}")

        # Calculate balance requirements
        max_count = max(counts.values()) if any(counts.values()) else 0
        balance_info = []
        for label in valid_labels:
            needed = max_count - counts[label]
            if needed > 0:
                balance_info.append(f"-{needed} {label}")

        # Update visualization
        self.ax.clear()
        if file_count == 0:
            self.ax.text(0.5, 0.5, 'No valid data found',
                         ha='center', va='center', fontsize=12)
            self.stats_label.config(text="No valid JSON files found in directory")
        else:
            bars = self.ax.bar(counts.keys(), counts.values())
            self.ax.set_title(f"Label Distribution ({file_count} files analyzed)")
            self.ax.set_ylabel("Count")
            self.ax.tick_params(axis='x', rotation=45)

            # Add value labels
            for bar in bars:
                height = bar.get_height()
                self.ax.annotate(f'{height}',
                                 xy=(bar.get_x() + bar.get_width() / 2, height),
                                 xytext=(0, 3),
                                 textcoords="offset points",
                                 ha='center', va='bottom')

            # Update balance information
            stats_text = "Additional needed to balance:\n" + "\n".join(balance_info)
            if not balance_info:
                stats_text = "All labels are balanced!"
            self.stats_label.config(text=stats_text)

        self.fig.tight_layout()
        self.canvas.draw()


class FileReviewApp:
    def __init__(self, root, directory):
        self.root = root
        self.directory = directory

        # Get the first file in the directory
        files = glob.glob(os.path.join(self.directory, "*.json"))
        if not files:
            raise FileNotFoundError("No JSON files found in the specified directory.")

        self.filepath = files[0]
        self.approved_lines = []
        self.disapproved_lines = []
        self.labeled_approved = {}
        self.labeled_disapproved = {}
        self.current_label = None
        self.current_index = 0

        # Load lines from JSON file
        with open(self.filepath, 'r') as file:
            self.data = json.load(file)
            self.lines = self.data.get("strokes", [])

        # GUI Elements
        self.button_frame = ttk.Frame(root)
        self.button_frame.pack(side=tk.TOP, fill=tk.X, padx=10, pady=5)

        labels = [
            "Arresto Momentum", "Ascendo", "Bedroom", "Descendo",
            "Livingroom", "Lumos", "Nox", "Revelio", "Silenco", "Totus Obscurum"
        ]

        for label in labels:
            btn = ttk.Button(self.button_frame, text=label,
                             command=lambda l=label: self.set_label(l))
            btn.pack(side=tk.LEFT, padx=2)

        none_btn = ttk.Button(self.button_frame, text="None",
                              command=lambda: self.set_label(None))
        none_btn.pack(side=tk.LEFT, padx=2)

        self.current_label_var = tk.StringVar()
        self.current_label_var.set("Current Label: None")
        status_label = ttk.Label(self.button_frame, textvariable=self.current_label_var)
        status_label.pack(side=tk.RIGHT, padx=10)

        self.canvas_frame = ttk.Frame(root)
        self.canvas_frame.pack(fill=tk.BOTH, expand=True, padx=10, pady=5)

        self.file_label = ttk.Label(
            root,
            text=f"Reviewing: {os.path.basename(self.filepath)}",
            font=("Arial", 12)
        )
        self.file_label.pack()

        # Control buttons
        self.control_frame = ttk.Frame(root)
        self.control_frame.pack(fill=tk.X, padx=10, pady=5)

        self.approve_button = ttk.Button(
            self.control_frame,
            text="Approve (1)",
            command=self.approve_line
        )
        self.approve_button.pack(side=tk.LEFT, padx=5)

        self.disapprove_button = ttk.Button(
            self.control_frame,
            text="Disapprove (3)",
            command=self.disapprove_line
        )
        self.disapprove_button.pack(side=tk.RIGHT, padx=5)

        self.back_button = ttk.Button(
            self.control_frame,
            text="Back (7)",
            command=self.go_back,
            state=tk.DISABLED
        )
        self.back_button.pack(side=tk.LEFT, padx=5)

        # Bottom buttons
        self.bottom_frame = ttk.Frame(root)
        self.bottom_frame.pack(fill=tk.X, padx=10, pady=10)

        self.export_button = ttk.Button(
            self.bottom_frame,
            text="Export",
            command=self.export_files,
            state=tk.DISABLED
        )
        self.export_button.pack(side=tk.RIGHT, padx=5)

        self.stats_btn = ttk.Button(
            self.bottom_frame,
            text="Show Statistics",
            command=self.show_stats
        )
        self.stats_btn.pack(side=tk.LEFT, padx=5)

        # Key bindings
        root.bind("1", lambda event: self.approve_line())
        root.bind("3", lambda event: self.disapprove_line())
        root.bind("7", lambda event: self.go_back())

        self.show_line()

    def set_label(self, label):
        self.current_label = label
        self.current_label_var.set(f"Current Label: {label if label else 'None'}")

    def plot_stroke(self, stroke):
        x_array = [coords["x"] for coords in stroke["strokePoints"]]
        y_array = [coords["y"] for coords in stroke["strokePoints"]]

        fig = plt.figure(figsize=(8, 4))
        ax = fig.add_subplot(111)
        ax.set_xlabel('x')
        ax.set_ylabel('y')
        ax.set_xlim(-0.6, 0.6)
        ax.set_ylim(-0.6, 0.6)
        ax.plot(x_array, y_array)

        return fig

    def show_line(self):
        if self.current_index < len(self.lines):
            line = self.lines[self.current_index]

            # Clear the canvas frame
            for widget in self.canvas_frame.winfo_children():
                widget.destroy()

            # Plot the stroke
            fig = self.plot_stroke(line)
            canvas = FigureCanvasTkAgg(fig, master=self.canvas_frame)
            canvas_widget = canvas.get_tk_widget()
            canvas_widget.pack(fill=tk.BOTH, expand=True)
            canvas.draw()

            # Update button states
            self.back_button.config(state=tk.NORMAL if self.current_index > 0 else tk.DISABLED)
        else:
            for widget in self.canvas_frame.winfo_children():
                widget.destroy()

            ttk.Label(self.canvas_frame, text="Review Complete!", font=("Arial", 16)).pack()
            self.export_button.config(state=tk.NORMAL)

    def approve_line(self):
        if self.current_index < len(self.lines):
            line = self.lines[self.current_index]
            if self.current_label:
                self.labeled_approved.setdefault(self.current_label, []).append(line)
            else:
                self.approved_lines.append(line)
            self.current_index += 1
            self.show_line()

    def disapprove_line(self):
        if self.current_index < len(self.lines):
            line = self.lines[self.current_index]
            if self.current_label:
                self.labeled_disapproved.setdefault(self.current_label, []).append(line)
            else:
                self.disapproved_lines.append(line)
            self.current_index += 1
            self.show_line()

    def go_back(self):
        if self.current_index > 0:
            self.current_index -= 1
            line = self.lines[self.current_index]

            # Remove from approved/disapproved lists
            removed = False
            for lst in [self.approved_lines, self.disapproved_lines]:
                if line in lst:
                    lst.remove(line)
                    removed = True
                    break

            if not removed:
                for d in [self.labeled_approved, self.labeled_disapproved]:
                    for label in list(d.keys()):
                        if line in d[label]:
                            d[label].remove(line)
                            if not d[label]:
                                del d[label]
                            removed = True
                            break
                    if removed:
                        break

            self.show_line()

    def export_files(self):
        current_time = datetime.datetime.now().strftime("%Y%m%d_%H%M%S")
        approved_filename = f"approved_{current_time}.json"
        disapproved_filename = f"disapproved_{current_time}.json"

        # Prepare approved data
        all_approved = []
        for label, strokes in self.labeled_approved.items():
            for stroke in strokes:
                stroke_copy = stroke.copy()
                stroke_copy["label"] = label
                all_approved.append(stroke_copy)
        all_approved.extend([s.copy() for s in self.approved_lines])

        # Prepare disapproved data
        all_disapproved = []
        for label, strokes in self.labeled_disapproved.items():
            for stroke in strokes:
                stroke_copy = stroke.copy()
                stroke_copy["label"] = label
                all_disapproved.append(stroke_copy)
        all_disapproved.extend([s.copy() for s in self.disapproved_lines])

        # Save files
        try:
            with open(os.path.join(self.directory + "/Checked/", approved_filename), 'w') as f:
                json.dump({"strokes": all_approved}, f)

            with open(os.path.join(self.directory + "/Checked/", disapproved_filename), 'w') as f:
                json.dump({"strokes": all_disapproved}, f)

            os.remove(self.filepath)
            messagebox.showinfo(
                "Export Complete",
                f"Files exported successfully:\n{approved_filename}\n{disapproved_filename}"
            )
        except Exception as e:
            messagebox.showerror("Export Error", f"Failed to export files: {str(e)}")

    def show_stats(self):
        StatsWindow(self.root)


if __name__ == "__main__":
    directory = "C:/Users..."  # Update this path as needed
    root = tk.Tk()
    root.title("Spell Review Tool")
    root.geometry("1000x800")

    # Style configuration
    style = ttk.Style()
    style.configure("TButton", padding=6)
    style.configure("TLabel", padding=4)

    app = FileReviewApp(root, directory)
    root.mainloop()
My wand data can be found here, and you can use Pete and Gustav’s program if you want to produce a lot of data fast. Running their program called “train” on your pc, and their code for the Arduino on the wand, you can connect your computer to the wand and record many strokes in a row, saving them all and then opening the saved file to find and replace the empty name fields in the data with the spell you were trying to draw.
I have also made a program for seeing and approving wand data that you can have a look at, adapting and using it if you have a lot of data, as I did.
This code allows you to open the .JSON data and review strokes, with their labelled spell, and approve or disapprove them, sorting them into two output files with those corresponding names.

Training new models
To train new models, you can use Google Colab, as I have done, with my slight adjustments to get Pete and Gustav’s original code to run again.
This model will ask you to provide data, and you simply upload the whole dataset with any new nets of strokes you may have generated. It will run through a lot of code sections, slowly generating the necessary precursors and then the AI model itself.
If you are adding new spells, you will need to add them to all of the programs we have discussed, making sure to count the new number of spells and replacing NUM_GESTURES = 10 and the equivalent sections of the Arduino code and the Wand Monitor code on the Raspberry PI
I highly recommend reading through Pete & Gustav’s original guide as it is what I used to build upon and will give you great insight on how to adjust anything.